When my husband and I designed our house, we omitted having a formal office.
In our rental we dedicated our smallest bedroom as an office but found we never used it unless we were fetching something we printed. Most of our "office" time was spent using lap tops on our couch in our main living area.
So we decided our habits probably wouldn't change, and I designed a desk on one side of our main floor family room to serve as the every day office area. Seating for the desk was a challenge. This wall is also the main traffic area for our open floor plan...so I decided rolling stools would be the best option.
When no one is at the desk, the stools can easily roll under and out of the way.
I bought two medical exam stools. I went with Brewer exam stools that have a metal base and cushioned seat and adjust up and down by spinning. I wanted a vintage industrial look but needed casters and durability.Buying them new is actually pricey, but I found one on craigslist and the other on ebay.

The chrome and medical vinyl felt like a doctor's office so I gave the metal base a coat of spray paint primer, followed by 2 thin coats of Oil Rubbed Bronze spray paint to match the desk hardware.
To refinish the upholstery, I decided to go with upholstery leather for a nicer approach than the standard vinyl. I've done a few other furniture projects with vinyl and it just doesn't last. So if you have a piece that gets a lot of traffic, or kids will touch it at all, if you can swing leather, go for upholstery leather fabric. I don't have access to leather locally, and I've ordered from The Leather Hide Store before and got a range of samples again for this project.
After looking at my samples, I decided to go with Metallic Blue upholstery leather. Stools are a nice small project so you can often find upholstery leather remnants rather than a full hide.
My husband and I made the counter for the desk from sheet metal. I torched it to bring out the varying colors in the steel, and felt the metallic blue upholstery leather compliments the metal desk top.
Our desk has room for two people to work, so ordering two stools meant they were originally mis-matched and looked out of place.
I LOVE the new matching metallic leather seats and it pulled this area of our house together with the industrial vibe of the metals and old schoolhouse design of the quarter-sawn oak desk.
TUTORIAL for LEATHER SEAT UPHOLSTERY
TOOLS: sharp scissors, pen, leather needle for machine, clips, staple gun, hammer
SUPPLIES: heavy duty thread, leather, staples
1. CUT OUT LEATHER
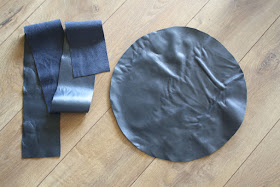
Since I was re-upholstering, I took off the vinyl original and used a straight razor to unpick it to use as a pattern. To trace the circle and rectangle for the sides, I used a regular pen and wrote on the wrong or unfinished side of the upholstery leather.
A basic round stool will have a circle for the top, and the strip for the sides.
2. SEW STOOL COVER
FIRST SOME TIPS FOR SEWING LEATHER:
To sew upholstery leather, you need a heavy duty sewing machine.
I have a basic Brother plastic home machine I bought off amazon, and there's no way that could sew leather....I have tried and it was a major fail.
I sewed this upholstery leather with an industrial 3/4 hp motor sewing machine. Tons of power and it sewed like the leather was quilting cotton.
Use a leather needle.You can't pin leather, so you can use fancy quilting clips, or cheap office binder clips.
Depending on your machine, a leather presser foot and walking foot may help, industrial don't have walking function.
Place your circle piece finished side up and the strip right side down. Leave an inch or two free and sew around the circle, leaving a 4" gap. This will create an opening with two flaps of the strip piece.
To create the side seam, I snip the two seam allowances where they will butt into each other and meet.
Then line them up and sew along the meeting edge.
The photo below shows this section isn't sewn to the circle until the arrow.
Trim any excess from your side seam, use a hammer to flatten seam open (since you can't iron leather) and sew the final 4" of curve to attach the side to the circle (the area between arrows below).
3. STAPLE TO STOOL SEAT
Both my stools had a wood circle base. I fit the new leather cover over the foam cushion, and stapled it to the underside of the wood. Start anywhere, then next put a staple directly across from that, stretching the leather tight. Then go the opposite direction, stapling 4 corners basically, then it should be tacked on with equal distribution and smooth even edge.
I used T50 1/4" tall staples.
Screw the stool seat back on the base and you're done!


Absolutely loving all of your house posts lately, Jess! You are amazing, seriously. Keep it up.
ReplyDeleteThanks, most were done so long ago, it's hard to remember details.
ReplyDeleteThese turned out really beautifully. I love how you really figured out what would work best for your personal habits and then made it work with kids too. Thanks for sharing these posts!
ReplyDelete