No button holes to sew.
Inexpensive.
Cute (in my opinion).
I've made an easy print out that's only 2 pages with all the instructions and the pattern. That way you can have the paper and pattern, and if you need reminders you can come look at the photos. I just thought it would made the project more user friendly since I don't have a computer right by my sewing machine and I assume you don't either.
Thanks and good luck!
Supplies:
-6 buttons
-1" wide black elastic (I bought mine in a package- 1 yd)
-1" wide black elastic (I bought mine in a package- 1 yd)
-leather (I re-purposed a thrift store purse)
-pants
-print out pattern
-thread to match
-print out pattern
-thread to match
1. Make leather pieces
I find the easiest and cheapest leather, is to buy a purse or clutch from the thrift store. Usually I can find one for $1-3, and it doesn't have to be cute--you're cutting it up.
**"pleather" or vinyl would also work too
-ON THE BACK SIDE of the leather, trace the pattern pieces. You'll need 1 triangle, and 3 long pieces.
-CUT OUT THE PIECES
2. Measure and Cut button holes
-measure the length of the button hole
button hole length = button width + button height + button height-Trace the length of the button hole on the back of all three yoke pieces on both of the round ends
-Cut the length of the button hole with a razor blade or exacto knife.
*because it's leather, it won't fray and is durable, so no need to sew the buttonhole!
3. Sew long pieces in half
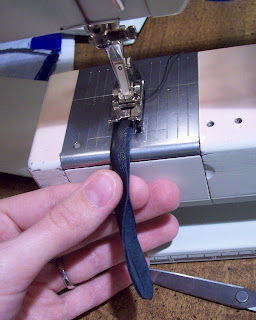
Top stitch along the straight portion of the piece, sewing only between the corners where it starts to widen out in the circle.
Guide 1/8" along edge of leather
4. Cut Elastic
Cut your elastic into 3 pieces.
2 will go on the front, over the shoulders, and meet in the back
1 piece will be short and go from the mid-back to the back of the pants.
The best way is to measure your child from the top of their pants, up over their shoulder, to the point right between their shoulder blades. This first measurement will be the length of the front 2 elastics, which will be your 2 long pieces.
Next measure from the point between their shoulder blades to the top of their pants in the back. This will be your measurement for the short piece of elastic.
For a frame of reference, my son is 2 years old and my measurements were:
Long pieces= 13 1/2" each
Short piece = 5"
5.Attach long pieces to elastic
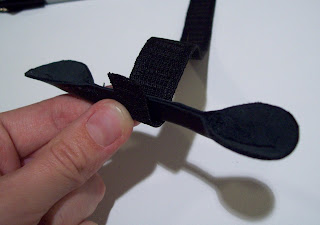
Take a leather piece, and seam side DOWN, (first photo the seam should be down, not up--it really doesn't matter, you can always flip it around once it's sewn) wrap the end of your elastic around it.
Sew back and forth on the elastic to secure the seam. So you'll be sewing the elastic on itself, but not the leather piece. It should be snug in there, but able to move around if you need to adjust it later.
REPEAT WITH ALL THREE ELASTICS AND ALL THREE LEATHER PIECES
At this point you should have 2 long elastics with leather attached, 1 short elastic, and the pants
6. Sew the elastic straps together
**The way you fold the elastic and sew the tab around the leather does give each elastic strap a front and back. Just be careful as you sew the 3 of them together that the right sides face out when worn***
Take the 2 long elastics, and line up the ends so they are 45 degrees apart. If the ends are cut straight, you just line them up to make the "V".
Sew them in place, I go back and forth.


Next, take the short piece, and line it up coming straight down from the "V". I put the straight edge to the top of the "V", as high as I could with out showing, and sewed in place.
7. Leather triangle
Place leather triangle on top of the right side of elastic junction. Top stitch around the triangle.
Suspenders are finished! Now you just need to add the buttons to the pants.
8. Put the buttons on the pants
Match the center (crotch) seam and the side seam together on one leg front. Mark that as the quarter measurement on that leg. Repeat with the other side seam and center seam to get the opposite leg's quarter measurement, or the middle of each leg.
Measure 1" to each side of the quarter mark on each side.
Sew on the buttons.
On the back, just measure 1" to each side of the center back seam and sew on the buttons.
Button the suspenders on the pants and you're ready to go!


Im so darned excited to make some suspenders. great job!
ReplyDeleteI love this! It is very cute. Another project adding to my incredibly long craft list.
ReplyDeleteAbsolutely adorable! Awesome idea, thanks for sharing it.
ReplyDeletePerfect for boy-gifts. With a little nephew on the horizon-I'm always on the hunt for something fun and useful too!
ReplyDeleteJana
Oh er that makes me want to breed! Its a good thing boy lives so far away...
ReplyDeleteWow, this is really nice and they turned out SO cute! Thanks so much for sharing, I'll be linking.
ReplyDeleteTHIS is absolutely GORGEOUS! I just have to make one of these for my son!! And the model is soo handsome!
ReplyDeleteThank you for sharing!!!
My husband just sent me your link, this is so cute, thanks a lot for the tuto :-)
ReplyDeletein. love. with. these!
ReplyDeletethanks for sharing, I put up link to them on my blog.
I'm loving your stuff!! I have a great bow tie pattern, now I can make my own suspenders!! Now I just to try out some hats to find the perfect one!
ReplyDeleteThese are great! It is the exact look that we are going for with my 3 boys in my sisters upcoming wedding! Where did you get his hat?
ReplyDeleteThis is exactly what i was looking for ,but to go on a pair of high waisted pants that i'm making from an old pattern.
ReplyDeleteThanx for sharing ur blog and work is just stunning .
Rubi
Um, how beautiful is your little boy in this? I LOVE it. Gotta make a pair for my son!
ReplyDeletewhy are you figuring button height TWICE for the buttonhole plus button width? Is that a mistake?
ReplyDeleteYour little one is sooooooo cute! Lucky, too!
ReplyDeleteCongratulations both for the idea and for the tutorial!
I'll try this although my boys are teenagers now. They'll love these.
I was recently looking to buy suspenders and NO ONE sold them… I was terribly sad, until now. I can MAKE them! Woot! Thanks for the directions and the great blog. Read It and Love It! :)
ReplyDeleteTop Seattle Divorce Lawyer website info