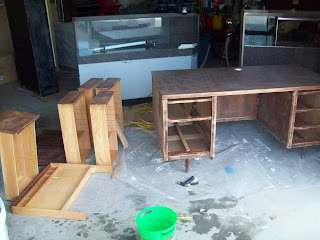
Basically a little reinforcing and paint to turn a piece of junk into the husband's sleek black desk.
Quite the upgrade, the 6 years we've been married, we've used a Lifetime plastic folding table for our "desk".
BEFORE:
This is the image for the classified I found for this desk online. It was $10.00.
It's a big executive all wood desk. 5' wide and 30" deep. It seems pretty old. Because it's solid wood, this thing is heavy, which is why it seemed so weird it had those wimpy little legs right in the middle.
Desk Make-over
1. Remove hardware
There was additional locking hardware in the back of the drawers we just took out and threw away. No key, and it was not looking functional.
This desk didn't have a hole for the computer cords, so luckily my mom had a drill attachment to drill a huge 2" hole in the top.
2. Sand
This was so old, the stain sanded off really easily.
3. Wash
Make sure you get all the sawdust off everything.
This was the worst part. Apparently this desk had spent some time outside. There were cobwebs, leaves, dirt, etc. in the back. I used the narrow extension on the shop-vac to suck everything out.
I washed it with soap and water.
4. Paint
I first painted the inside of the drawers white. There were ink stains and just years of use I wanted to cover up to start fresh.
I used a primer on the table top and let it dry.
Next I used the same Glidden black onyx paint in semi-gloss to paint the black. I used a roller as much as I could to get a smooth finish.
It took 2 coats of black
5. Spray paint hardware
 These handles were so nasty. They were so gross, I couldn't tell what color they were supposed to be, I think originally they were a brass/gold color, but the layers of grime were so thick they were almost black. I used 220 grit sandpaper to clean the grime off. While I was sanding, I was thinking how much better the cup drawer pulls would be.
But the metallic silver spray paint did the job once they were clean and it does look nice and modern now.
6. Polyurethane the top
I used a spray to get an even coat, but it took a lot of the can. I think if I did it again I would use the paint on poly.
7. LEGS
Now, what to do with these crappy little legs.
I had a bunch of different ideas, but all ended up costing more than the $10.00 we paid for the desk. So I ended up making legs out of our scraps for free.
The desk needed to be 7" off the floor, so I cut 4x4 post scraps 6.5" tall and screwed them to 1/2" MDF scraps.
Just the same black paint and they support the desk in each corner.
Just the same black paint and they support the desk in each corner.
DONE!
Another little before and after
It will be nice to have an actual desk with drawers now!
I think the new legs help it look manly.


That looks great! How fun. Still waiting for my "larger" house to go on the hunt for new items to redo :) Glad you have a great looking new desk, and for so cheap...the best!
ReplyDeleteGreat job!
ReplyDeletewow. I've had a fair amount of success turning garbage furniture into something great... emphasis on FAIR. this is great!!
ReplyDeleteLove the thick "manly" legs. They look way better. What were they thinking with those wimpy cheap center legs? Yuck.
ReplyDeleteGreat job.