


Since then, we've used it as a toy box in our family room and it looks like this, overflowing with stuffed animals and looking crappy.

So I made a new lid and cushion, along with a paint job to hopefully make it look like a bench rather than the toy box.

MAKE LID
1. LID
I bought a little 2'x4' sheet of MDF 1/2" thick for the lid/ seat.
I had the guy at Home Depot cut it down to size for my box. I measured 1/4" overhang on the front and two sides.
2. PAINT
I chose not to prime. So I just painted 2 coats of semi-gloss white paint. I painted the lid separate from the chest.

3. ATTACH LID
I used a long skinny "piano hinge" that was 1/2" wide on each side, and 30" long. It was $6.50 and worked well to secure the lid to the skinny back wall of the chest.

4. ATTACH LID SUPPORTS
I debated whether or not to add the lid to the toy box. Lots of comments in this post gave reasons for or against the lid. The main concern was the lid coming down on kids' heads and fingers.
But I found these cool hinges at Lowes for only $2.65 each called Spring Lid Supports.
They have right and left hinges.

The directions where to screw the hinges are specific and on the package. Once it's on, it holds the lid up and open, then folds on itself to close. These are awesome and I found I only needed one to hold up the toy box lid. The lid can only open 65 degrees with the hinge, but I thought it was plenty of room to get everything out, plus it prevents the lid from opening to much and hitting the wall behind the chest.

The lid is finished and onto the cushion!

MAKE CUSHION
1. FOAM
I always forget how stinking expensive foam is. JoAnns had their foam 50% off, and it would have still cost me $15.00 for 2" thick foam. So I took the cheaper route with using 1" foam I already had from Walmart. So I just layered 2 pieces together to make the foam 2" thick. I did have to whip stitch some scraps together for one of the layers.

2. CUT PIECES and MAKE PIPING
I measured my foam to know how big to cut my cushion fabric, and added 1" in each direction for 1/2" seam allowances. I cut a top out of canvas, and used scrap denim for the bottom.
For the sides, the same thing, adding 1" for seam allowances. Since my foam was 2" thick, the strips for the sides were 3" wide.
PIPING: To make the piping, I cut the yellow canvas 1.5" wide and sewed them together in one long strip. I measured the perimeter of the cushion and cut a piece of thick cord with a few inches to spare. Next I folded the skinny strips around thick cording, and using my zipper foot sewed the piping in, leaving the first and last 3-4" unsewn.
3. SEW PIPING TO TOP and BOTTOM
Using 1/2" seam allowance with the zipper foot, sew the piping all around the edges of the top and bottom pieces. Leave 3-4" unsewn in the beginning to connect it with the end.
When you get to the end, you need to connect the two pieces. I lay it flat, and take the yellow strips to see where they lay meet, then sew the yellow strips together. Next I trim the cord to match up and just sew it all to the base. Step 4 in this table cloth tutorial has better pictures demonstrating this step to bring the two ends together.

4. ADD VELCRO
To fix the problem of having a cushion on the toy box that would fall off all the time, I used industrial velcro to secure the cushion to the box lid.
So I sewed 2 pieces of the soft side of the velcro to the bottom cushion piece.

5. ADD SIDES AND ZIPPER
I decided to have a zipper in the back of the cushion side to get the foam in and out. For the back side, rather than cutting a 3" wide strip, you cut 2 strips 2" wide. Then you sew them together, adding the zipper in the center seam. With 1/2" seam allowances, once the zipper is in, that strip should be 3" wide like the rest of the side strips.
Then you just sew the sides to the top piece, meeting the two ends up like the piping.

6. SEW CUSHION TOP TO THE BOTTOM
At this point, you just line up the corners of the sides to the corners of the bottom piece and sew them together around the big rectangle.
**Make sure you leave a few inches open in the zipper before you sew the cushion shut. You need the hole to flip it right side out.
7. VELCRO THE FINISHED CUSHION TO BOX LID
Once you've flipped the cushion cover right side out and jammed the foam in, you can attach the scratchy halves of the velcro to the box lid.
The industrial velcro has a super sticky backing. So I just stuck the scratchy velcro (with the plastic backing still on) to the cushion on the fuzzy velcro half. Then I peeled the plastic backing off, then positioned the cushion on the lid and stuck it down squash the velcro onto the lid. This way the velcro on the lid would match up where I want it to the cushion velcro.

Then it's finished!!

It goes in our family room right next to our garage door, so I am glad to have a bench to sit on to get shoes and coats on before heading out the door.
So far it's been great, the velcro keeps the cushion where it should be (unless the little guy pulls it off), and the spring lid hinge makes it safe. But the best part is it looks a lot better, and I can hide the toy mess.

joining linky party @ savy southern style
I've been trying to use some of my "goodwill knits" to make space.
I had this blue ribbed-knit sweater I used to wear all the time in high school. So it got a second life, this time that of a boy's sweater vest.

I actually bought 5" of brown ribbing for this project. I usually just cut up other knit I have, but I couldn't find any brown shirts in my stash.

Not that you can see it, but I also added a 2" ribbing band along the bottom, as it was just a shirt hem, not a nice sweater bottom. Sewing with the knit sweater can be a pain, as it can stretch a ton, and become deformed as you sew. To avoid this, I sewed with my tension at 10, and stay stitched the sweater neckline before I sewed the ribbing on top to help stabilize it from stretching huge.

It's a good tutorial, and a pretty quick project, and I always like to see my high school favorites somewhere else rather than the trash or good will. Yes, I have clothing from high school that I've carted around for years, just waiting to be upcycled. I hope that doesn't gross you out.

This is a quick, easy baby blanket.
The fabric makes it in this case, because there's not much skill involved as far as quilts go.
The fabric makes it in this case, because there's not much skill involved as far as quilts go.
It's just 2 pieces of fabric sewn together, then bound so I didn't use any batting between the layers.
I found minky and flannel backed satin on sale, so one side is super soft, then the other is silky.


Already our 2 year old son has been dragging it around, and took his shirt off to wrap the satin around his back. So it was a hit with him, even though I kept telling him it was for baby Ellie and he was just borrowing it.

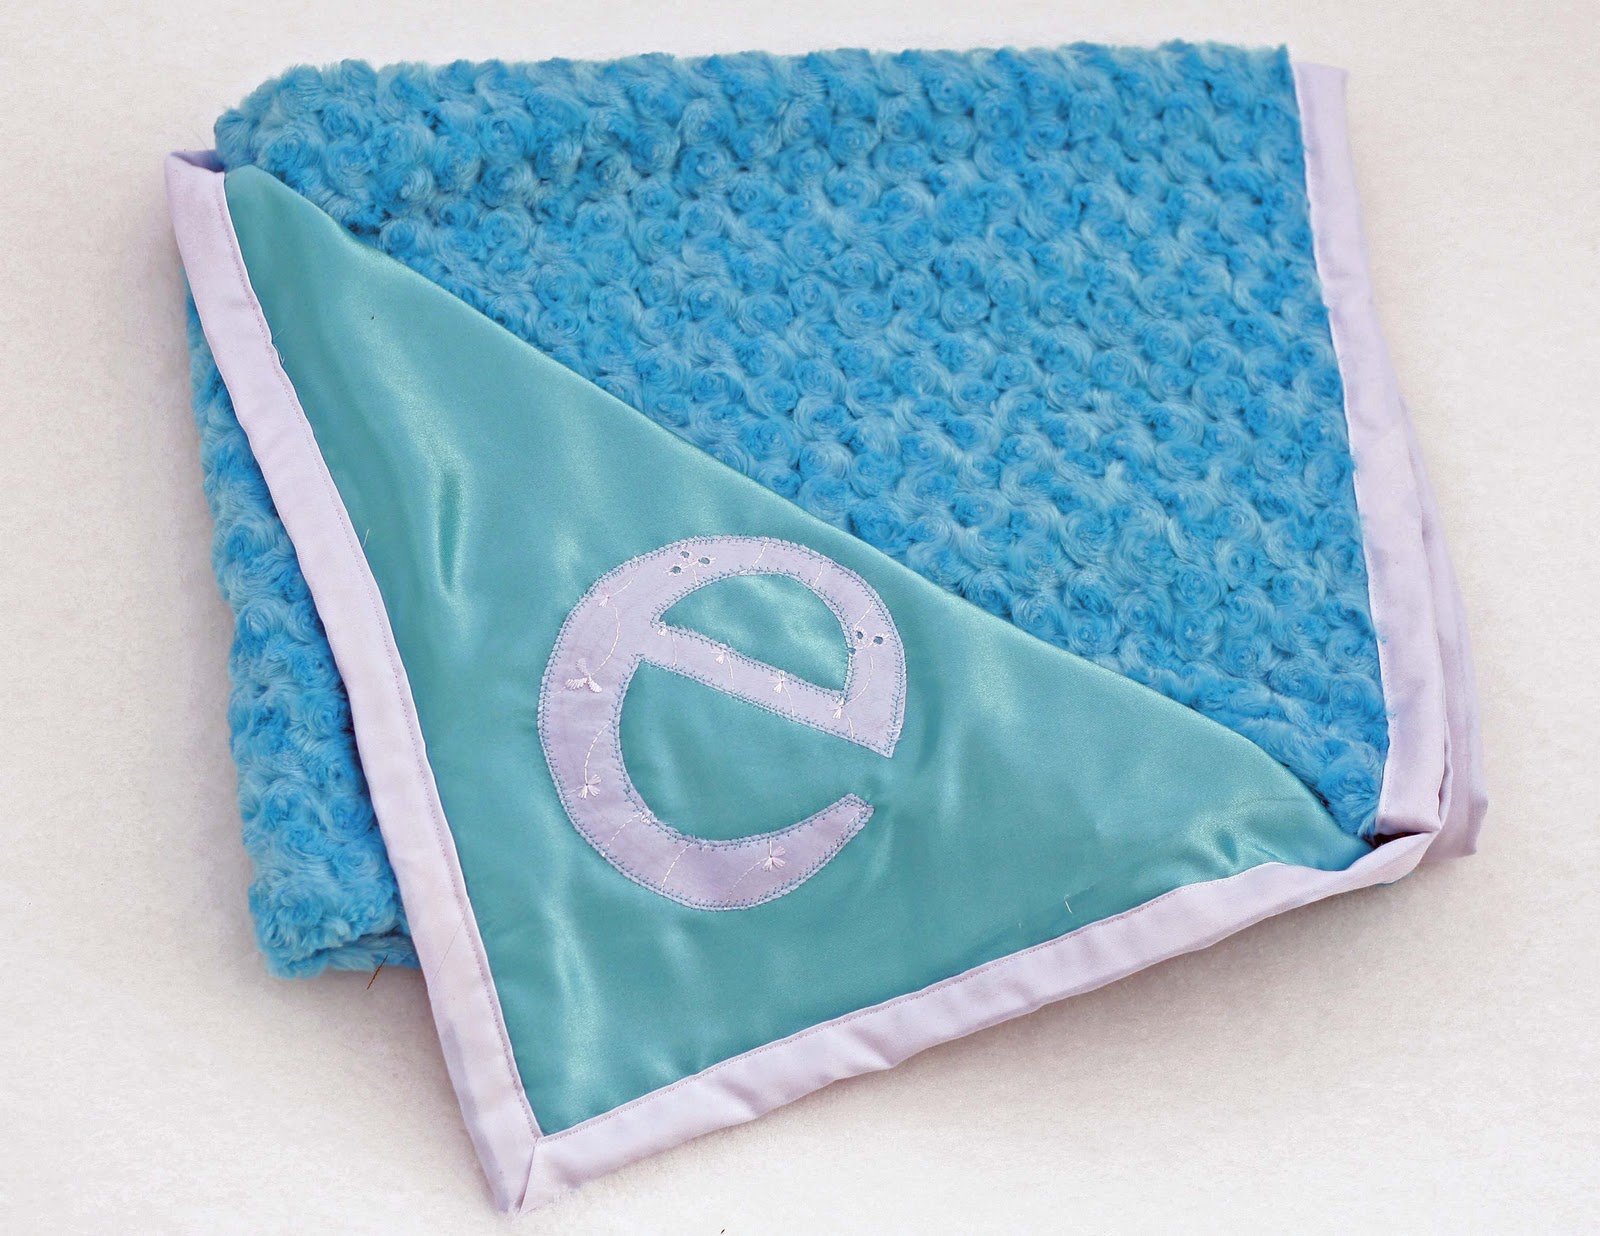
This is for our baby girl that is due in a few weeks. We're naming her Ellaria, and so the "e" is her first initial.
I used fusible webbing to iron it the satin side of the blanket. I top-stitched the edges in turquoise.

I just bought one yard of the minky, but it was 60" wide, so I got 1.5 yards of the satin. So this blankie is a little bigger, 1 yard x 1.5 yards.


Here's a little pattern to make a simple owl applique.


You can cut the pieces out of felt, fleece, or any fabric really.
There's different ways to make an applique using fusible interfacing/ webbing, lots of ironed on starch, or just sewing the layered pieces on top of the base.
Whichever way you prefer works. I used fusible webbing on this little guy, then top-stitched the face on.

I also did some contrast stitching on the wings before sewing them to the body.

A little detail I added is the feather body.
Using brown craft feathers, I placed them on my fleece body and zig zagged down the center shaft of the feather to sew them on. I added the eye buttons and green belly buttons too.


I chose to put this little owl on a tote for my little guy.
Santa brought a couple trains for Christmas, and they never leave his side. It used to be Woody, but now he's been abandoned in the toy box since Christmas morning. He takes these trains everywhere and even sleeps with them. So I made this little tote so he can lug them around easier.


I'm sure there are free tote tutorials around, or you can sometimes find little kid sized ones at dollar stores too.
I use grosgrain 1" ribbon to make quick easy handles on mine to save time. Who wants to turn a skinny tube of fabric right side out?
Like any applique, you could sew it on a shirt, bag, wherever. So far it's been nice to have a little tote for my toddlers treasures.

My husband got a down comforter for Christmas.
But it's not really a comforter for our bed, more like his blankie. He'll take it in the basement when we watch movies, and so it came time to cover it so the white casing didn't get trashed.
It surprises me how much duvet covers can cost.
So when I found extra-thick flannel sheet sets 50% off at Fred Meyer I thought I could make one cheaper than purchasing one, especially when he didn't care what kind of fabric or print. The selection was slim, as these were the winter/ christmas sheets on clearance. After digging through snowflake sheets a while, I found a solid red set in Queen size.
**I had enough fabric to use queen size sheets for a queen sized comforter. It would be easier to find a larger sheet size (king) for a queen comforter so you don't have to piece the fitted sheet.

So the sheets became the comforter duvet.
Here's some instructions followed by a diagram. I didn't take photos of the process, because it's such big sewing, I didn't think it would really help that much.
Also, there are many ways to close the duvet, like buttons. But I made it easy with the longest generic zipper I could find: 24 inches long.
Also, there are many ways to close the duvet, like buttons. But I made it easy with the longest generic zipper I could find: 24 inches long.
INSTRUCTIONS:
1. Take the fitted sheet and trim off the elastic on the edge, and cut the corner seems so it will lay flat.
2. Trim the flat sheet to the dimensions of your comforter.
3. I had to trim and piece strips on the fitted sheet to make it the full size of the comforter to match the top sheet.
4. Take one of the shorter sides and sew a 24" general zipper in, obviously with the sheets right side together.
5. Open the zipper a couple inches, then sew the rest of your sides together, then use the hole left in the open zipper to turn right side out.
6. Fit your comforter in through the 2 foot hole from the zipper, and zip it up your done!


I thought I may have to cut up the pillow cases, but I had enough fabric with the sheets for the duvet cover.
Because the comforter as mentioned before isn't our bedding, I need to get going on my plans for the real master bed.
***Just wanted to add another great idea from Tanya that she left in the comments.
To sew cord in each corner of the duvet, then sew the same ties to the corners of your comforter, to keep the comforter in place within the duvet. I will have to add them.
***Just wanted to add another great idea from Tanya that she left in the comments.
To sew cord in each corner of the duvet, then sew the same ties to the corners of your comforter, to keep the comforter in place within the duvet. I will have to add them.
Now for a quick thrift store re-do!

This is another quick spray paint project.
I found this vase at the thrift store for $1.00. I thought it had an interesting shape, but I thought I'd prefer it opaque rather than clear glass.
So I used gray spray paint primer first. Then a couple coats of white on top.


JoAnn's was having a sale on artificial stems, so I got 2 for this weird vase. I thought the vase could also work empty on a bookshelf or something.
I'm gone! The poll closed tonight and my project had the fewest votes, so I lost this week on Project Toddler Runway. I'm glad I realized I would be off early on in the voting though--before I made next week's project.
Here was my project inspired by an assigned hair accessory.

This was a harder week for me...obviously. :) I struggle with feminine ideas--my mind is always blank. But it's good to be forced into areas I normally wouldn't go I guess.
I was dreading being assigned a huge frilly flower, and was glad when I got this hair accessory for my project.

Simple and dainty.
I focused mainly on the two bottom ones, the blue and white combo, and also thinking to use the simple tiny flowers as a subtle detail rather than a huge focal point.
I enlisted my 4-year-old niece to model my project, and obviously get to keep it. Her mom gave me her measurements, but I was a little nervous, hoping it would fit. I just used my son's t-shirt as the base of my homemade pattern, and when we got together, it fit her perfectly!
Because the coat is blue, I did make the lining pink and girly. It would probably be really cute as an overall pink coat too, but I chose blue, although the whole blue vs pink Sleeping Beauty scene did cross my mind.
Her dress was blue the majority of the movie, and she's a princess, so I went with blue.

My favorite part of the whole thing is hidden in the lining. Below the neck, where a tag would be, I sewed a flower shaped little tag with her name sewn on. Not real emoboidery, just stitching with the feed dogs down and a darning foot, I guess free motion sewing.
I think she loved her name "fancy" in her coat.

So the buttons are little flowers, drawing the inspiration from the assigned hair accessory.
I chose to have the closures velcro, so these buttons are just sewn on as a design element. Beneath each one, is a square of velcro, except the top center flower that is a snap.
I thought velcro would be easier for her to get the coat on and off herself, rather than tiny buttons right under her chin.

The left tab is just sewn on with no function, but the right tab has velcro to close the waist of the coat shut.
It's styled like a double breasted coat, having the under side velcro to the back of the front near the waistline, then the front folding clear across the body, with the tab to help keep it closed, and add a little detail.

I added a slight ruffle to the end of the sleeves.
I prefer the more simple style, but tried to make this little coat unique and interesting looking by using contrasting and asymmetrical lines.

So it was fun to be on PTR while it lasted. On to more projects on my list for the house, decor, baby and a few organizational/ storage projects.
I only have 9 weeks until my due date, and my list of things I'd like to accomplish is long, but seems possible as long as my growing belly doesn't slow me down too much.
My vintage colored book bundles were featured on Knock Off Decor today!

It's an awesome site by Beckie at Infarrantly Creative.
My favorite part of the blog is the projects are divided into company tabs, so you can go right to Pottery Barn or West Elm to see what people have been making DIY.


