
Christmas Tree Applique Quilt
4:05 PM

 I love Figgy Pudding by Basic Grey for Moda fabric. I've drooled over it all season long, but at $8-9 per yard, thought it would be out of reach. Recently I bought two turnover packs (6" squares cut diagonally into triangles) that were more than half off.
I received my precious Figgy Pudding fabric triangles and for one pack decided to make a quilt. My mom's family (my grandma and her 8 daughters) are really into quilting. Designing their own patterns. Hand quilting on quilting frames. Hours of tedious work with sore thumbs. Quilt purists.
Unfortunately, I don't have quilting frames yet, or the time to make a purist quilt. I also don't own a convenient quilting machine, which would make everything easier.
So I came up with a quicker, cheaty way to make my quilt. Basically an applique quilt. Minimal geometry in the design, quilting on my standard sewing machine. For the purist quilters, this may be lame, but it was quick and fun, and I love the outcome.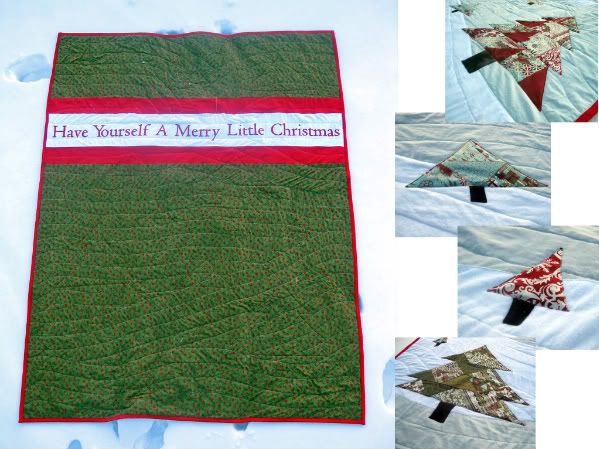

A cozy quilt for winter.

SUPPLIES:
-white (5 yards) I used white flannel I found for 1.99/yd
-blue (4.5 yards) I upcycled a queen sized fitted sheet that tore. Just trimmed off the elastic edges and cut out the corner darts
-turnover pack (1 pack has 80 fabric triangles)
-brown just enough for little tree trunks. amount would vary on your trees
-red (2 yards or so) I upcycled a thin blanket, that was really wide, making it convenient and hard to determine exact yardage
-green backing print: (4.25 yards) or any backing you like
-batting: I used the warm & natural kind of batting 96" wide, so I just bought the width of the quilt, 76" = 2.11 yards **I chose this batting over the fluffy stuff because it is thinner and more compact to make quilting on my sewing machine easier
MAKING THE FRONT OF THE QUILT
 To construct the front of the quilt, I was using a sheet and 5 yards of white flannel. I wanted the background to look like a rolling landscape, so I would measure and cut the width of the quilt (76"). Beginning at the bottom, I cut the curves I wanted, for me the bottom was blue. I did the same thing with the layer up, white. To connect each piece, I ironed 1/4" down along the curve of the lower piece (blue in the first case). Next I'd lay the two pieces together, matching up the sides, pin them, then just top stitch along the curve. I continued this method, adding each curvy piece up the rest of the quilt. No planned method, just using the sheet as I could around the tear, and alternating between white and blue, adding layer on top of the next layer.
-After all the layers were sewn on top of the next piece, I flipped it over, and many seams had large chunks of excess on the back, from curving up--so I trimmed those off.
 -Next, some of the sides didn't match up perfectly, so I folded it in half, then in half again, so the quilt was folded in quarters, and trimmed up the edges so the sides were even.
-Finally, pressed the seams.
 At this point I laid down the landscape and used my figgy pudding triangles to plan out where the trees would be and which fabric to use for each tree. After they were all planned out, I took them off to sew each tree.
 **I chose to quilt the whole quilt, then add the trees at the end.
MAKING THE BACKING OF THE QUILT
 For the majority of the back, I used a green print with red stars. I cut two sections the width of the quilt (76"). This fabric is 45" wide, so together they ended up being about 20" short to cover the full length of the quilt. Rather than piece more green, I chose to make a contrasting band across the back to make up the difference. The white flannel piece measures 10" high with 5" of red banding above and below.
 I decided to add "Have Yourself A Merry Little Christmas" to the white band. I used the freezer paper method and red fabric paint.
1. Cut freezer paper down into 8.5x11" sheets so they could go through my printer
2. Print off the text mine ended up using 8 sheets with text size: 350 pt
3. Cut out letters using scissors and exacto knife
4. Plan out text on white strip, pin paper to fabric
5. Iron down freezer paper. Add the inside of the letters like: a, e, etc.
6. Paint in the letters
7. When dry, peel off freezer paper and heatpress to seal paint.
From there, just sew the straight seams to construct the back. Press seams.
I chose to cut one green section in half, so the red/white band could be 1/3 from the top rather than right across the middle.
PUTTING THE QUILT TOGETHER

 To secure all the layers, lay them out in order. I chose to put the backing face down, batting, then front on top. Beginning on one long side, pin all three layers together using large safety pins to baste quilt together. Work from one side of the quilt to the other, smoothing the layers, and aligning everything as you go.
NOW IT IS TIME TO QUILT
I chose to quilt on the back first, just going around the words. After the text was outlined, I flipped it over to finish quilting the top. For the rest of the quilt, I sewed cruved lines along the shapes of the landscapes, 3" apart.


TIPS FOR QUILTING ON YOUR STANDARD SEWING MACHINE:
-WALKING FOOT: Kind of expensive, but very helpful. (Mine was an included bonus when I purchased my machine.) The walking foot is great for quilting because it lifts the foot up off the fabric with each stitch, basically like having baby feed-dogs on top to help move the fabric through. Walking feet are also nice because you can attach seam guides inches away from your needle.
-ROLL QUILT TIGHTLY: When you're quilting in the middle, you have to fit half of your quilt in the arm of your machine. It can get difficult to navigate on the fabric and manipulate such large hunks of fabric. Quilt from the middle out, rolling up on end tightly as you would a sleeping bag. As you work your way down the quilt, you unroll the tube, and it gets smaller and smaller, therefore easier and easier to sew.
-KEEP ALL LAYERS TIGHT: for me, this is the hard part. You really have to stretch the layers as you sew along, or one will pucker and gather unevenly...which happened to my quilt despite my attempt to hold everything tight as I sewed along.
-HAVE TABLE TO THE SIDE: Working with large pieces can get heavy and difficult to work with. I find having an extra table, or lots of room on your sewing space to help hold the weight of your quilt as you sew really helps. You can get quite the upper body workout trying to hold all that fabric and batting as you sew.


After the quilt is all sewn together, I chose to bind the edges before adding the Christmas trees.

I cut stips of the red 3.5" wide.
1. Trim quilt edges evenly after its quilted
2. Press in half
3. Baste on the edge of the quilt with 5/8" seam allowance
4. Flip to other side of quilt
5. Fold binding over to meet the edge of the quilt
6. Fold over again, making 1" binding
7. Top-stitch along, guiding along the edge
2. Press in half
3. Baste on the edge of the quilt with 5/8" seam allowance
4. Flip to other side of quilt
5. Fold binding over to meet the edge of the quilt
6. Fold over again, making 1" binding
7. Top-stitch along, guiding along the edge
HOW TO BIND CORNERS EASILY
There are fancier methods, but this is what I did. I sewed the binding on the top and bottom first.

1. trimmed off the edges of top and bottom corners
2. Baste on the binding like usual, leaving a little beyond.
3. Fold the extra down over trimmed corner
4. Fold in touching edge of quilt
5. Fold in half again and top stitch down
QUILT IS FINISHED AND BOUND, JUST NEED TO ADD THE CHRISTMAS TREES
QUILT IS FINISHED AND BOUND, JUST NEED TO ADD THE CHRISTMAS TREES

I designed my trees to first make individual rows, then sew the rows together, then added the trunks to the bottom.


After the tree is sewn together, iron down all the edges 1/4". The corner of each tree branch can be folded up to make a pretty good point. 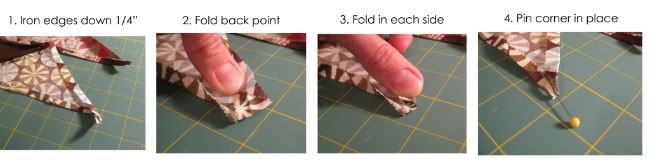

Pin all the trees on the quilt, then topstitch them in place. I used the walking foot for this also.
IT'S FINISHED!
The biggest challenge, I think, is sewing on such big pieces of fabric. Overall I liked the convenience of an applique quilt, just adding layers on top of one another. The quilting didn't end as tight and smooth as if I'd quilted it on frames, but it was much faster to just whip it out on the machine.


2 comments
Oh my gosh I love this!!! And its so big!
ReplyDeleteBeautiful!!
ReplyDeleteThank you for stopping by, we love to hear from you!