
Washcloth Puppet Tutorial
11:47 PM
Puppets for bathtime! Take your older washcloths that are still usable and make them into something great! So far the favorite seems to be the shark. I was trying to figure out a crab, but I think it would need to be more of a glove than the mitten puppet.

Supplies:
-washcloths or hand towels
-2-3" of ribbon
-detail fabrics for fins (I used satin for the green fin on the alligator, hot pink spandex for the fish)
-fabric marker or buttons for eyes
-scissors
-thread/ sewing machine/ pins
**To make these even easier, you could use fleece, felt, or knit for the fins/ arms. The body and mouth of puppet should be washcloths or towels, but you aren't cleaning with the details so you can use fabrics that won't fray and dry quickly
**when you print your pattern be sure to change the print settings for your printer in Page Scalings to None, or to print Borderless.
Your printer may also let you know the page is beyond the printing range, click print anyway.
The bodies of the shark and alligator puppets should be the entire width of the 8 1/2 x 11 copy paper when printed out. If they aren't when you print, the pattern will still be to scale, the puppets will just be a little smaller.**
If this PDF file printing seems confusing, email me: runningscissor@gmail.com and I will email the pattern in a Microsoft word document that you can just print that way. Please put "washcloth puppet pattern" as the subject of your email.
1. Cut out pieces

 I traced the patterns with a sharpie.
You'll only need 1 fin and 2 feet if you're using knit, fleece, or felt. Any other fabric, like my lime satin, you need to cut 2 fins, 4 feet.
Cut out the pieces.
*With the alligator, I left an edge around them when I cut them out to make it easier to sew since I was flipping them right-side-out later.
2. Eyes

The fish was a little fancier and I sewed button eyes and zig-zagged with a short stitch length to make the pink gills.
The alligator and shark I kept it simple by just drawing on the eyes and shark gills with a fabric marker.
***At this point if you are using the fleece/ felt/ knit legs and fins, you can skip to step 5***
3. Make Head Fin

Starting with the head fin, put the 2 pieces right side together.
 Sew 1/4" seam allowance along the zig zag of the fin.


*For the fish I used a wave stitch in lime green on the edges to add some detail
4. Make Arm Fins or Legs


Using tweezers (I use surgical hemostats) reach in and pinch the end of the foot, and pull it out, turning the feet right-side-out.
You can use the tweezers or a pen with lid on it to push the little toes out
SHARK and FISH FINS
Sew with 1/4" to 1/8" seam allowance.
Trim the tip of the point like the alligator head fin
Turn right side out.


5. Pin and Sew Arms to Body

Sew on the legs/ fins.
I zig-zagged with a shorter length stitch (1) and narrow stitch width (2 to 2.5) back and forth to secure the legs and arm fins to the body
6. Sew the Head Seam and Fin

So you have a sandwich of washcloth, fin, washcloth. The washcloth body is right sides together with the feet folded inside.

Sew along the top 1/4" from the edge
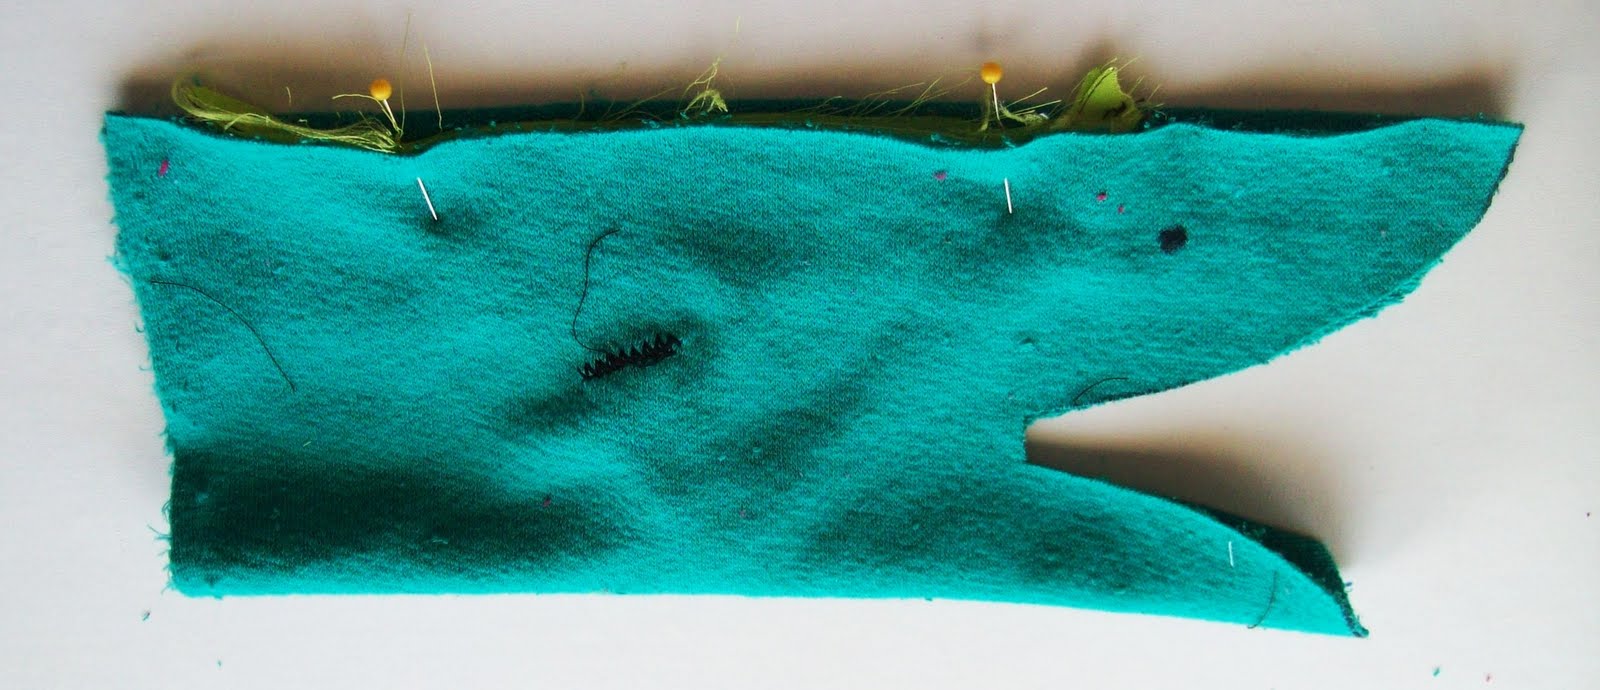
7. Pin on the mouth

Lay the puppet on its back, still inside out. Fold back the bottom lip.

Line up your mouth to all the edges.

 Pin mouth to head all the way around.
8. Sew Mouth on Puppet

Flip your puppet so the mouth (red) is flat on the table. I rolled the body of the puppet up so I could see easier the shape I was sewing. Sew 1/4" from the edge and just go all around the mouth.
**This is probably the trickiest part. Just go slow around the corners, and adjust the rolled body that is sitting on top to keep it out of the way.

The alligator is more of a mushroom shape, fish is an oval, and shark is more of a diamond.
Snip the corner of the mouth, but don't snip thread.
Turn the puppet right side out.
9. Hem the End and Add Ribbon

Now your puppet is pretty much finished, and right side out. Fold the end under about 1/4" to 1/2". Fold the ribbon in half and pin so it's hanging out the back.
 Sew along the edge with 1/4" seam allowance. When I sew over the ribbon, I go back and forth a couple of times to secure it on well
Your puppet is finished!
*Extra options:
I sewed the hem of the fish with the same wave stitch for extra detail.
I top-stitched along the lips of the alligator and shark, but liked the puffy lip look on the fish.
I sewed the hem of the fish with the same wave stitch for extra detail.
I top-stitched along the lips of the alligator and shark, but liked the puffy lip look on the fish.

I'm sure many of you will end up with cuter puppets and I'd love to see your twists on this idea! I briefly tried to find waterproof googly eyes, but ended up keeping things simple.
runningscissor@gmail.com
runningscissor@gmail.com


21 comments
Jessica, this was SUCH a great idea. This would be fun to make for a child's birthday gift!
ReplyDeleteI totally voted for you and didn't even know they were yours!!!!!! Well, I had a sneaking suspicion! I am so excited to make these for my little guy!
ReplyDeleteFabulous!! Thank you for putting the effort into writing the tutorial and sharing it :)
ReplyDeleteThese are so cute!! Thanks for sharing it with us!
ReplyDeleteOnce again, your talent amazes me! Thank you for the tutorial, I will add this to my ever growing list of projects to finish (or start, haha). Thanks again!
ReplyDeleteLove that idea!
ReplyDeleteOk Jess, for those of us that don't sew, can you go ahead and just put those in your etsy shop...because you KNOW I will buy them :)
seriously.
What a great idea! Makes me wish we had littles young enough to be into these! (I see a few cute gifts in my friend's future!)
ReplyDeleteJessica,
ReplyDeleteSo far your last two crafts have been my favorite! You're doing a great job on SYTYC!
-Sarah from Create Studio
www.createstudio.blogspot.com
LOVE the shark!! Thanks so much for the tutorial, can't wait to try it out!
ReplyDeleteThese are SOOOO cute!! I linked to your pattern & tutorial on Craft Gossip Sewing:
ReplyDeletehttp://sewing.craftgossip.com/free-pattern-bath-mitt-puppets/2010/05/10/
--Anne
What a GREAT idea! love it!! I linked your tutorial (and blog) on my craft forum: http://www.missimagination.com/forums/showthread.php?t=1705
ReplyDeleteTFS!
- Elizabeth
I love these washcloth puppets.
ReplyDeleteThank you for sharing them with us!
Have a wonderful week!
Thank you for this great tut!! I linked to your tutorial on my blog.
ReplyDeleteEleonora, an Italian girl in Sweden
This comment has been removed by the author.
ReplyDeleteThese are so great! They're a little advanced for me to try, but I'm bookmarking this for the future. Thanks for a great tutorial!
ReplyDeleteThese are adorable!
ReplyDeleteI have added you to my "Yellow Get Crafty" carnival, due on 1 Sept!
As a reference, here is this month's Summer Get Crafty! http://redtedart.wordpress.com/2010/08/01/get-crafty-aug-2010-summer/
Hope that is ok!
Maggy, Red Ted Art
info(at redtedart (dot) com
Such a cute idea--thanks for sharing!
ReplyDeleteLOVE them! I can't wait to make some and my kids will love them. Thanks for sharing the tutorial.
ReplyDeleteAmber
Great post, the young Mum's group I work with might like this, not got them on sewing machine yet, but this would inspire them to have a go. Thanks
ReplyDeleteLove this so much I had to make them for my friends baby shower. But instead I made a family of sharks! Check them out here: http://qreativequail.blogspot.com/2011/03/shark-attack.html
ReplyDeleteThanks for your tutorial!
Hi! I just made one of these cuties for my nephew who turned one today. It is such a fun idea! thank you so much for sharing!
ReplyDeletehere's the link to my post: http://madebynight.blogspot.be/2012/07/bon-anniversaire-arthur.html
Thank you for stopping by, we love to hear from you!