
Hipster Hoodie Variation: Skirted
4:00 AM
With fall here and weather cooling off, I made Ellie a new version of the hipster hoodie.
It's been a good transition to fall with long sleeves, but still just a knit tee shirt before we bust out coats and jackets to play outside.
It's been a good transition to fall with long sleeves, but still just a knit tee shirt before we bust out coats and jackets to play outside.

This dress is a variation of the hipster hoodie pattern, originally just a hoodie for my son:

To add the circle skirt, I cut off 1" from the bottom of the hoodie, but it's a little long, so in the future I think I'd go more with 2-3" shorter in the hoodie body pattern, and move the pocket up 1" or so. Right now it's kind of a hipster flapper dress.
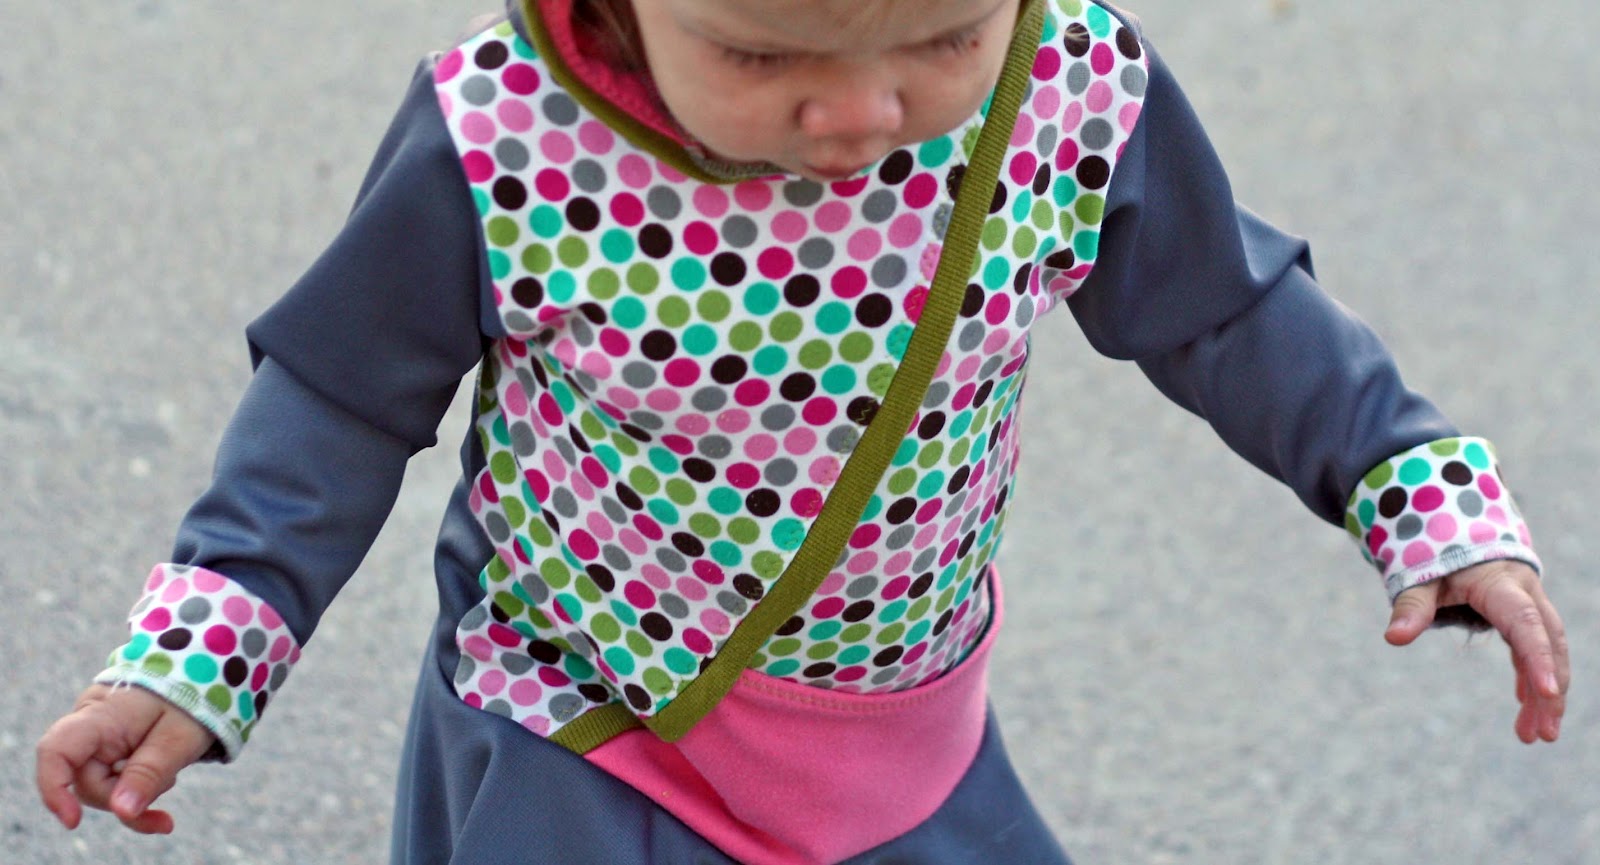
Once you've shortened the pattern for the hoodie bodice, you sew the circle of fabric on the bottom just as you would the contrasting waistband in the pattern.
It's easy to make a circle skirt, here's a few tutorials:
You can make your circle skirt as long as you need. Ellie's is 8" long.
To get the waist on her dress to match the circle skirt, I cut a waist radius of 3.25" for the 12 month sized hoodie.
Because this is a dress, and not made to go over another tee shirt, I made the smaller size.
Ellie is 18 months but shown is the hoodie pattern 12 month with the added skirt.
To get the waist on her dress to match the circle skirt, I cut a waist radius of 3.25" for the 12 month sized hoodie.
Because this is a dress, and not made to go over another tee shirt, I made the smaller size.
Ellie is 18 months but shown is the hoodie pattern 12 month with the added skirt.
Fabric:
The pink was an upcyled tee from my mom.
The dot interlock knit I bought from JoAnn, but only 1/4 yard on sale to make leggings. When I decided to make this dress, I stretched what was left over for the hoodie.
So in this rare case, she has matching leggings to go with her dress.

To add some of the dot print to the back, I pieced a strip across between her waist and armpits.

The gray is actually a ponte knit, which is a "stable" knit and only has about 10% stretch, but I thought it would hang better as a skirt with more structure and weight to it.

Another variation was adding the chartreuse ribbing to the hem of the skirt, and around the face edge of the hood.

To add the ribbing to the hood edge, I first basted 1.5" wide strip ironed in half to the hood lining (pink in this case) just as you do when adding the strip to the hoodie front diagonal.
Then when you sew the hood exterior to the lining, the contrasting rim pokes out between the layers. It was pretty wavy after sewing, but pressing it with steam ironed out the waves and shrunk the ribbing right back in place.

This was intended for fall with the long sleeve variation, meaning she'll always wear it with leggings so her chubba legs don't freeze, but you could add a skirt to the short sleeve variation for a cute summer dress as well.


We're switching into some fall and Halloween projects around here this week too!


4 comments
Thank you so much for this post. I want to let you know that I posted a link to your blog in Creative Busy Bee Craft Inspirations, under the Page 2 post on Oct. 08, 2012. Thanks again.
ReplyDeleteyou have totally done it again.!!!!! of all the px, Ellie sitting on the step shows off the dress beautifully and she looks so precious.
ReplyDeleteAdorable! This one looks so comfy too.
ReplyDelete~Michelle
I like it but I feel like it needs the zig zag finishing between the skirt and hoodie part.
ReplyDeleteI love this pattern but my son has out grow it, any chance your are planing on a 4-5t size?
Thank you for stopping by, we love to hear from you!