


I don't have that large of a chest, but I hate when a button-up blouse fits great everywhere, but across the chest, it doesn't quite accommodate enough, and the buttons hold it together, but the fabric gaps.
Now I'm not talking the shirt is too small and the buttons are holding on for dear life, but those tops where a larger size would be too big, and you just have slight gaps across the peak of the chest.


To solve this, just top stitch about 3 inches where the problem area lies. You will have to put the shirt on over your head from now on, but that is no big deal to me now that I don't have potential gaps of cleavage to worry about.
Maybe this is obvious and not that great of a tip, but I wish I'd been sewing my button-up tops long ago for this reason. I used to buy the bigger size then alter the side seams to take it in for the bottom half, much more work that wasn't necessary.
Maybe this is obvious and not that great of a tip, but I wish I'd been sewing my button-up tops long ago for this reason. I used to buy the bigger size then alter the side seams to take it in for the bottom half, much more work that wasn't necessary.


 I've been wanting to make a mobile for the nursery for a while. We have this corkscrew willow tree with really great branches that I planned on being the frames, but I couldn't figure out what to use as the hanging ornaments. His room is kind of jungle/ safari/ animal themed, so I thought about different bugs, but could never think of anything I could make.
But I got excited when I found these pods in our backyard. They were flower pods that dried up and hardened. I painted the inside green and the outside blue. I got little willow branches and wired them into 2 triangles. I hot glued the corners to help the wire hold it all together. To hang the two triangles, and all the pods, I used fishing line. The pods are so light any air movement makes them twirl, showing the different colors. It turned out better than I expected.


It is for a boy and ocean themed. Lobster, fish, sea turtle.
I 've been wanting a rain coat for a while, but I'm going out of town for the weekend and it became more important. I was having trouble finding any raincoats, apparently their season has come and gone. But luck had me try Old Navy, where I found this gianormous coat--XXL for $5.99, on clearance from $49.50 originally. Plus it was red!!! Because it was so cheap, I got it and decided to alter it. All I had to do was remove the belt loops and take the side seams in a ton (8") and the sleeves. In the end it worked out great because I have football shoulders so it ended up fitting the width of my shoulders, and it's the only coat/jacket I own with sleeves that actually go to my wrists--orangutan arms.
 've been wanting a rain coat for a while, but I'm going out of town for the weekend and it became more important. I was having trouble finding any raincoats, apparently their season has come and gone. But luck had me try Old Navy, where I found this gianormous coat--XXL for $5.99, on clearance from $49.50 originally. Plus it was red!!! Because it was so cheap, I got it and decided to alter it. All I had to do was remove the belt loops and take the side seams in a ton (8") and the sleeves. In the end it worked out great because I have football shoulders so it ended up fitting the width of my shoulders, and it's the only coat/jacket I own with sleeves that actually go to my wrists--orangutan arms.
BEFORE AFTER


 Also, notice the snow. That's right, May 15th it snowed 3".
Harry Dunne:
"You mean you've had those gloves the whole time?!?!"
Lloyd Christmas:
"....yeah. We're in the rockies."
This
 skirt was first inspired by THIS dress when I was looking around for sack dress ideas. I loved the box pleated strip on the neck line. I found this green floral print for $2/ yd. The skirt cost $4.00!! I used a skirt I already had for the pattern. So basically a normal A-line skirt with the pleat train around the hem.

 skirt was first inspired by THIS dress when I was looking around for sack dress ideas. I loved the box pleated strip on the neck line. I found this green floral print for $2/ yd. The skirt cost $4.00!! I used a skirt I already had for the pattern. So basically a normal A-line skirt with the pleat train around the hem.
I cut the skirt on the bias to help it hang better. Then measured the circumference/ length of the hem so I would know how long to make my pleat train. I tripled the hem length and cut a long strip 4.5" wide. I sewed it into a long tube--I think it was 190" long.  Flipped it right side out and pressed the seam in the back of the tube. At this point you have a super long flat piece that is 2" high.
 Flipped it right side out and pressed the seam in the back of the tube. At this point you have a super long flat piece that is 2" high.
Next, pressing each pleat I made the face 2" wide tucking the fabric underneath, making box pleats. So each pleat should be a square on the front if I measured correctly.  Pressing each pleat helped set it, and then I used masking tape to keep them together as I worked along the whole length of the strip. Once they were all pressed and taped, I basted along one side about 1/2" from the edge. This was probably the most time consuming step.
 Pressing each pleat helped set it, and then I used masking tape to keep them together as I worked along the whole length of the strip. Once they were all pressed and taped, I basted along one side about 1/2" from the edge. This was probably the most time consuming step.
Then all you have to do is pin it to the skirt, I pinned the bottom of the pleat train 3" above hem. Top stitch over basting stitching to secure pleats to skirt.  I zig-zagged a narrow white ribbon on top.
 I zig-zagged a narrow white ribbon on top.
 This was a quick project, finished in one evening after the baby went to sleep.
My friend asked me to make her baby girl a tag book thing. I asked if she had specific colors in mind, or if there was an animal that reminded her of Presley. She said: "probably a hippo, but that's not very nice." So I hope the ballet hippo is cute--not mean.


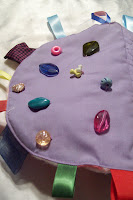
Jewels & Name


Buttons & Hippo


Jewels & Name
I sewed thin satin ribbon down for name, and free quilted around it.


Buttons & Hippo
My favorite part is the blue tutu that sticks up off the rest of the body.


Bead Sliders & Butterflies
I liked the pink fleece because the flowers are raised and have good texture for little hands. The butterfly wings are 3-D folding off the page.

 Now that I am done nursing (HOORAY!) and don't have to wear shirts/skirts, I thought I'd treat myself to a dress. Most of my dresses are empire waists so I wanted something different. I LOVE eyelet. I found this lavender for $2/yd so that was sweet. I also have teal and sand colored eyelet that I don't know what to do with.
A sack dress appealed to me because it isn't fitted, so when I sit down I won't see my fat rolls on my gut. Also, I wanted a light, casual, fun summer dress that is overall COMFORTABLE. Because the nature of wearing a sack isn't too flattering, I didn't want it to look like a maternity tent. I don't know if I succeeded, maybe it still does look like a maternity tent, but it is comfortable and so it works.
 The yoke and pleats seemed on all the photos to help make it more shapely without turning it into a fitted dress. I used this pattern: Simplicity 2933 and I'm a novice at using patterns and I survived, despite a few calls to my mom to answer questions. I added pockets in the side seams, I love dresses with pockets for some reason.
Anyway, I'd recommend this pattern for a comfy spring/summer dress. It takes less than 2 yards of fabric, so pretty inexpensive. It cost me:
-$6 for fabric (I had to have lining because eyelet has holes, so double the fabric)
-$.50 fusible interfacing
-$1.99 for pattern (Hancock fabrics have great pattern sales around Easter)
So about $8.50 to make this sack. If I'd selected a fabric that didn't require a second layer it could have been $5.50!
In my google image search I saw a lot of people that throw a belt on top of sack dresses, but I am ruler shaped and that would accomplish nothing I think....but do I really know about fashion and how to wear flattering clothes? Not really, I want to wear sacks as an alternative to sweats.


Front Back
Be glad I chopped my head off so you could be spared.


