
Birdcage Tutorial
11:04 PM
or week 1 of SYTYC, the theme was Folksy. I made a birdcage with 2 love birds inside, and little paper butterflies resting on the twisty tendrils of the cage. Here is the tutorial to make the birdcage!

SUPPLIES:
-grapevine (approx 20 feet or so)
-thin floral wire
-wire clippers
-deli lid
-keychain ring
-hot glue gun
-finish supplies: scrapbook paper, cardboard, ribbon etc.
-finish supplies: scrapbook paper, cardboard, ribbon etc.
***Grapevine:
 My mom has grapes in her yard, and pruned them a month or so ago, so there was a large pile I chose from. If you have a neighbor with grapes, they may also have spare vines from last season. I don't, but I also thought if you live near vineyards that may be another source to collect some vine.
But if you don't have grape plants near you, I found a few retail sources to get some.
Here's a website that offers a variety of thicknesses in straight sticks or wreaths: http://www.save-on-crafts.com/grapevines.html
Hobby Lobby or JoAnn's also carry grapevine wreaths for $1.25 to $2.00. It may take more than one wreath potentially, it just depends on how large the wreath is, and how tightly they've woven the vines. Other craft stores may also have grapevine.
****You will be shaping the grapevine, so if it is older and dry, you could soak it in water for 24 hours or so to help it soften up so you can bend it without breaking. If you are using a wreath that is already round, you may not have to really shape your vines.
1. Cut your grapevine
3 feet long
6 -10 vine segments (my cage used 6 total vine segments, I cut extra in case I break them in step 2. You could also add more to make the cage have more sides around it)
My vines were relatively straight, so I chopped a stack using a straight measuring tape. If your vines are curled from a wreath, you could use your flexible sewing measuring tape, or just cut a piece of yarn 3 feet long to use as a guide. These cuts aren't exact, due to the odd shapes of the vines. You'll be trimming off any excess, so just hack of chunks that are pretty close to 3 feet long.

2. Shape Your Vines
Starting at one end, add a little pressure to the vine. This will bend the inner stock of the vine, and at the same time the crunchy dry bark will break off.
Just tear off the bark and throw it away when it's shaped.
Slowly and carefully work your way around the vine to shape it from a straight stick into a curved arch.
**This is where dry/ older vines may need to have soaked in water to help give them flexibility. You need to bend the vines without breaking them.
3. Mark the center of your vines
Using a flexible measuring tape, I marked the center of the vines (18")

4. Start the cage at the top
 Grab your keychain ring from your junk drawer, or you can purchase a bag in the office aisle, usually next to the paperclips/ brads/ etc.
 Grab your thickest and longest vine chunk.
Slip the keychain ring on the vine and wire it to the center mark on the vine.

You just need to wrap the wire around the ring once or twice, then twist it together underneath. This is the ring you'll hang your cage from. I just hung my cage with a wide pink ribbon.

5. Add next vine
Grab another vine segment, and put it perpendicular to the first vine. Wire it at the center point, keeping the wire tight and twisting it a little when you're done.

SO YOU ARE ADDING VINES FROM THE TOP TO THE BOTTOM, BUILDING THE CAGE UPSIDE DOWN.
6. Add more vines crosswise around the center
Keep the center of each vine lined up at the wires, and just keep adding the vines across from eachother as you work around the cage.
I don't have any specific tips for wiring, I just try to keep it tight and twist in between each twig to bring it back to center. I also wire each vine to the vine below it to help keep the positions of the vines crossing the center in tact.

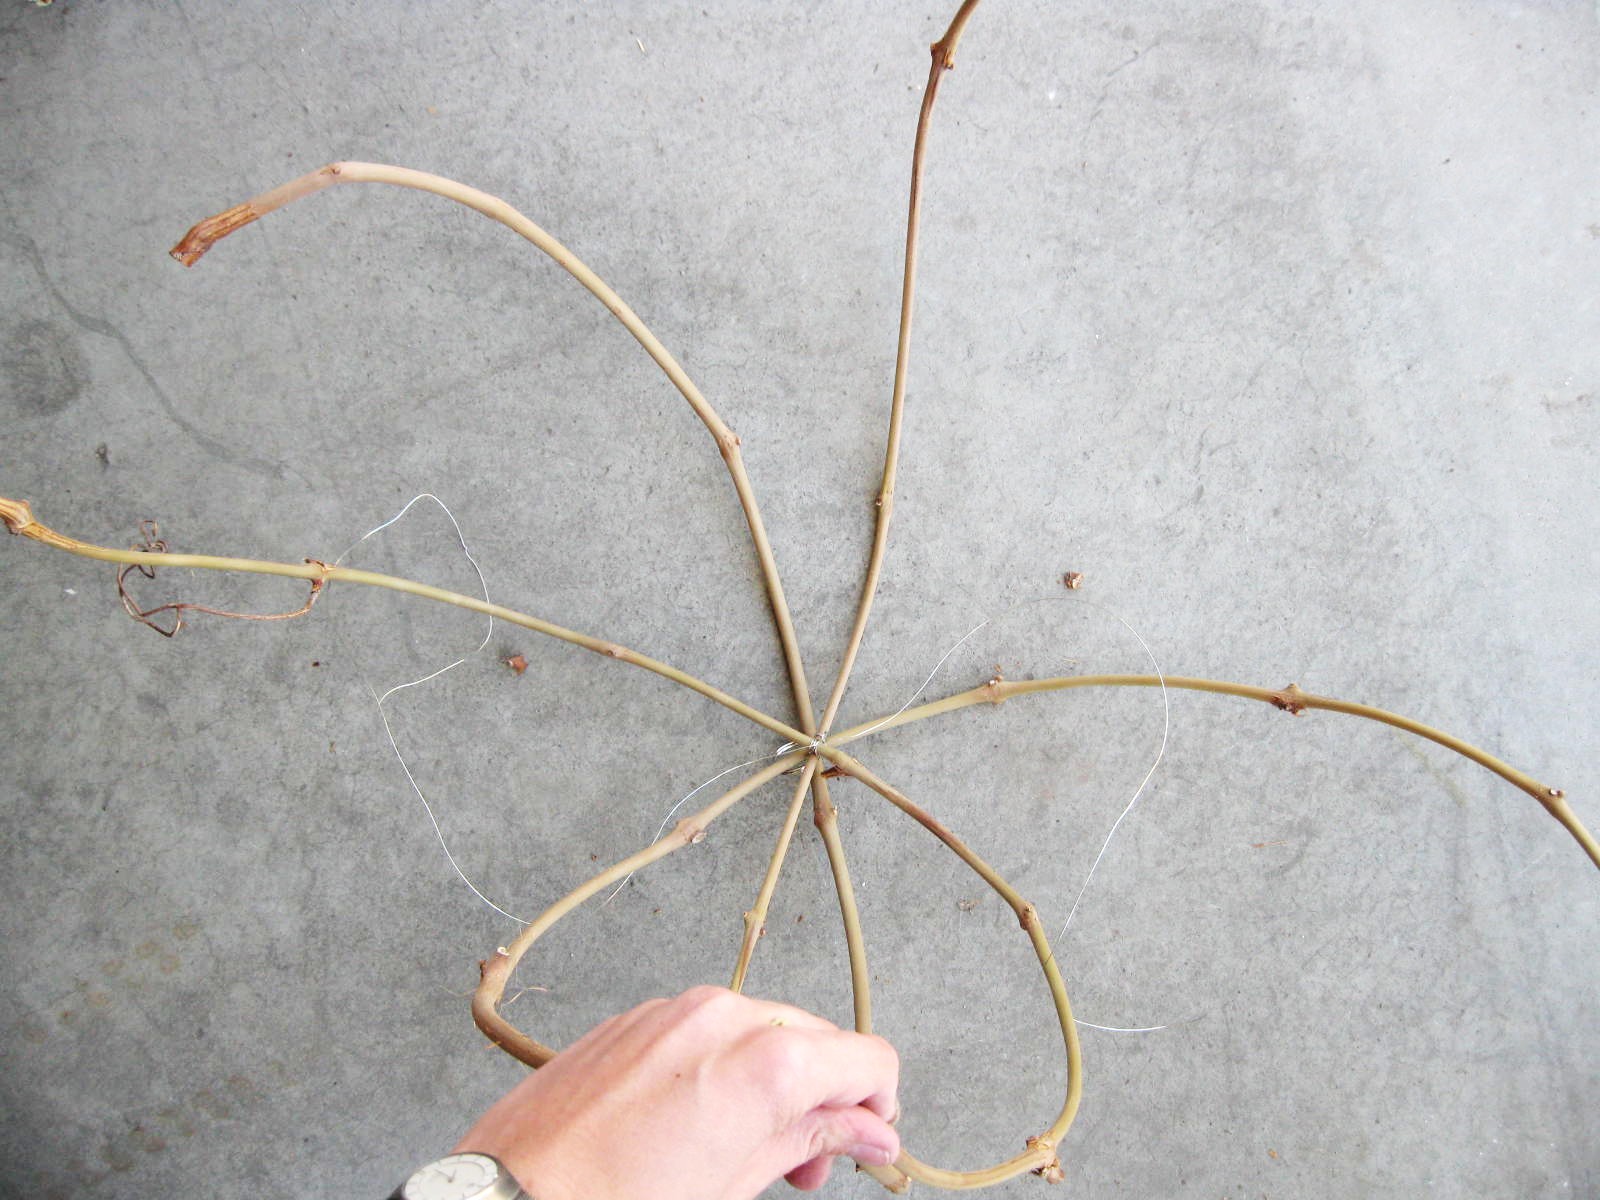
I added 6 total vines, making the cage have 12 branches going around, since each vine provide 2 sides.

7. Make base
 Take your deli lid and grab some scissors. I just used a yogurt lid from the large containers. You can use larger lids, like a Cool Whip lid, but it will change the shape of your cage. Having a smaller lid, like a typcial sour cream lid, makes the cage bell out and back in like an oval. A larger Cool Whip type of lid would give the cape more of a rainbow shape, with the sides coming almost straight down rather than curving in.
**If your vines don't bend easily, the larger lid may be a good option, reducing the amount of bend you'd need**
Simply cut out the center of the lid, just inside the rim that raises up.

9. Wire vine ends around Deli Lid Base
 At this point your cage needs to be upside down and somewhat stable. I grabbed my largest bowl to help keep it's shape as I secured it to the base.
To wire each end to the base, I used shorter pieces of wire, maybe 6-10" long. So I just cut 12 pieces, not measuring or anything, just grab a chunk and cut them off.
Starting with the vine that is closest to you, so at this point it would be on top. But techinically, when the cage is hanging, it will be the bottom vine in the center wired pile.
Grab one end of the top vine. Wire the end to the base.


Take the opposite end of the same vine and wire it across from the first wired end.
So the vine is wired exactly across from each end.

Next, grab the next vine that is opposite the first vine, and wire both ends opposite itself:

From here, you can just keep grabbing the next vine on top and wire it around the circle until all 12 ends are wired down.


So at this point you should have what resembles a birdcage!

10. Shape cage
You can see from the above photo, due to the different shapes of the vines, there are some that poke out from the cage and look weird. So shape the cage by pushing the longer vines down through the wires, until you have a nice round shape with all the sides.
This means you'll have different lengths of stubs at the base.

11. Trim excess Stubs
Using my shrub cutters, I trimmed off the extras.

12. Hot glue ends to base
I used the hot glue to further secure the ends to the base, filling in the space between the vine and the plastic. I thought it may melt the deli lid, but it did great. *I glued before I trimmed for this photo*

13. Finish off the cage
I spray painted the cage white.
 For the bottom, I traced the bottom of the cage onto scrapbook paper. I used Elmer's glue to attach the paper circle to cardboard. I then cut out the cardboard, making a pretty papered circle.
To lace the bottom to the cage, I used a hole punch around the edges of the cardboard circle. Then I just used a narrow pink ribbon to lace it around the base and between the vines.
My cage had large enough gaps I just put my hands between the bars to get the birds in and adjusted.

Hope this helped if you would like to make your own birdcage! If you have any other tips to make the process easier, or a source to get grape vine, please leave a comment to help others out!
Thanks,Jessica


12 comments
This was a great project...very out of the box. The little birdies were my favorite. Best wishes with next week.
ReplyDeleteThis one is super great! Might have to keep this on my summer project list. My girl would love it. Good luck this week.
ReplyDeleteVery creative...how did you come up with the idea?
ReplyDeleteoh man I LOVED this one!!! So cute!
ReplyDeleteThat is so cute! And I might even be able to handle those types of birds :)
ReplyDeleteI love this! I'm going to try to make it for my baby girl's bedroom :) It will fit in perfectly!
ReplyDeleteThis is soooo cute! You're a genius. Thanks so much for sharing!
ReplyDeleteLove this!! I am going to try to make one & would love to know where you got the birds or if I could buy some from you!!!
ReplyDeleteYou make it look so simple! And it turned out great! Well done! Thanks for sharing ... I've posted a link.
ReplyDeleteSOOO cute! What a great idea... I love it. :)
ReplyDeleteFor goodness' sakes, that is so cute!
ReplyDeleteOh wow this is so creative!! It's just sooo adorable! I'm happy to be your newest follower of your amazing and would love to invite you to my link party/giveaway every Friday at FrouFrouDecor! Hope to see you there!
ReplyDeleteHugs,
~Terrell @ FrouFrouDecor~
Thank you for stopping by, we love to hear from you!