
Lattice Pillow Tutorial
10:30 PM
For my master bed, I wanted two smaller pillows with some texture.

They were going to be white, and it reminded me of this scarf I'd seen from VandCo.

But I thought the ruffles might be too frilly for what I wanted, and decided to make the texture on the pillow more subtle and simple. So rather than ruffles, I used double fold bias tape. Sewing on the bias tape gave the lattice design, and the 4 layers of the tape gave it some height to add the texture I wanted.

So to make your own.
For these pillow forms, I actually bought a cheap basic standard pillow from Walmart for $2.00 and cut it in half, sewing the cut edge shut.
So to make your pillow cover, you can use this tutorial for the construction of the basic pillow envelope cover. Basically you add 1" on each side from the dimensions of the pillow for your pillow front. For the envelope back, cut 2 pieces with the same height as your pillow front, but add enough fabric so they can cross.
For example, these pillows the front was 12.5" x 18" and the 2 envelope backs were 12.5" x 13"
So once you measure your pillow and cut the fabric for the face or front of the pillow, you can mark your lattice lines.
MARK LATTICE LINES
Draw a single line diagonally, with a 45 degree angle. I chose to start close to one corner on mine.
{like an idiot I cut my pillow face not paying attention, and didn't have enough fabric to cut a new one, thus the ugly vertical seam on the right side, try to ignore my mistake}

Next draw the other lines parallel {I know the photo says perpendicular but I meant parallel for this and I'm too lazy to change the photo, sorry} to your first line. I drew my lines 3" apart. You could put them closer together to have smaller diamonds on your finished pillow.

Then draw your other set of diagonal lines in the opposite direction, this time perpendicular. Once again I just drew one anywhere, then spaced the other lines 3" apart.

MAKE BIAS TAPE
I chose to just make my own bias tape for these pillows. But you could buy it, or use ribbon, ruffles, rick rack, etc. instead of tape. Actually, mine isn't true bias tape because I didn't cut it on the bias so I could save fabric. Because the tape won't be curving, the strips didn't need to be cut on the diagonal.
So you cut your strips, then iron the sides in, then iron the sides on top of each other, folding them inside the tape. My 2" strips made 1/2" thick bias tape.

SEW ON TAPE
Start with one direction of lines and sew the bias tape on, top stitching on each side of the tape with 1/8" seam allowance.

Make sure you sew all the lines in one direction first.

Then add the rest of the lines on top of your first set on the opposite diagonal to make the lattice design.

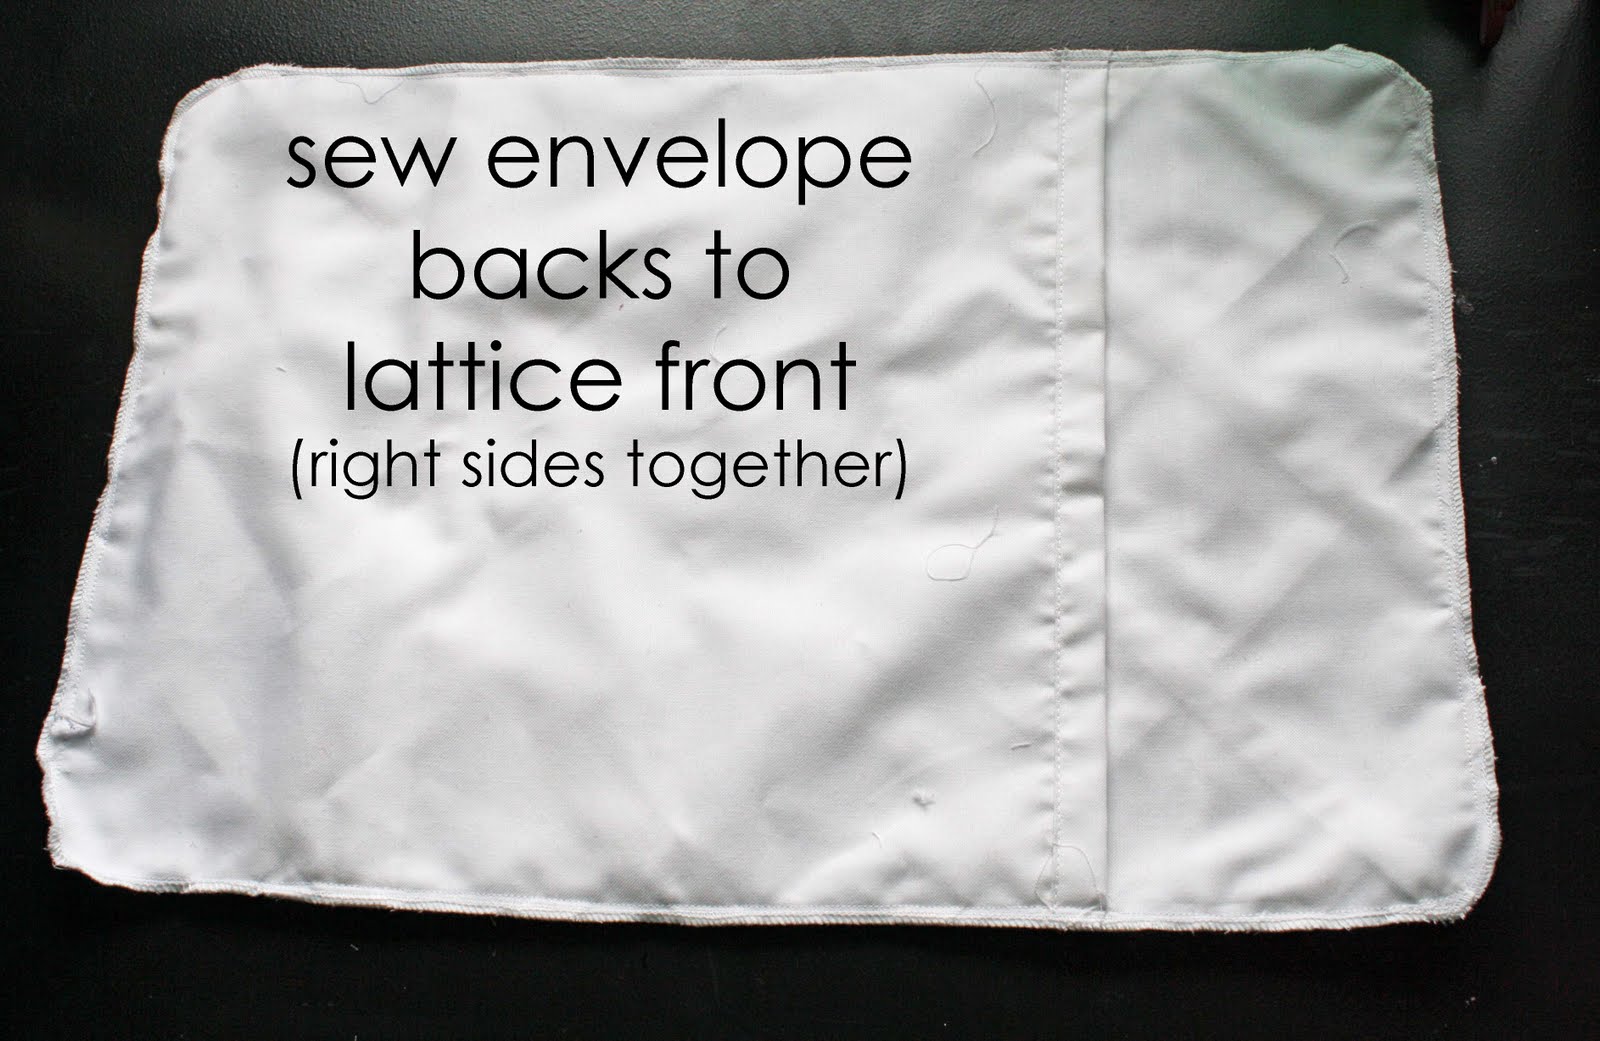
CONSTRUCT PILLOW COVER
Now the front of the pillow is finished, you can plop your two hemmed pillow envelope pieces face down on your lattice front so right sides are together. Then just sew around the edge with 1/2" seam allowance.
Your pillow cover will be done and you can flip it right side out and jam the pillow in.
You're finished. There's lots of ways to make this pillow design more exciting, like using printed background fabric and contrasting lattice lines. Or making the lattice lines stand out more with ruffles, ribbon, etc. My version is pretty plain and simple compared to all the ways you could use the idea. You could also draw your lines closer or farther apart to change the size of your finished diamonds.


19 comments
Very simple, clean line and fresh looking. A nice change from the frills you see on many pillows these days.
ReplyDeleteThese are really nice, they look really simple and expensive x
ReplyDeleteWhat a great idea! I want to try these.
ReplyDeleteThose are adorable Jess! :)
ReplyDeleteWow! What awesome pillow covers. We are moving soon and I get to decorate my entire house and these definitely make me want to make some "bias" tape. Thank you for sharing!
ReplyDeletehttp://loveaffairwithmybrother.blogspot.com
Really great idea. I might have to try this one...soon.
ReplyDeleteThats a great idea! I just bought a euro pillow sham at Ross yesterday, but I could not find a mate for it. So, I think I am going to cut it up and make smaller pillows with it. Im planning on sharing what I do and how I do it on my blog. :)
ReplyDeletewww.justcallmeblessed.blogspot.com
I LOVE this idea! And I really love the idea of taking a $2 walmart pillow and cutting it in half! Why didn't I think of that before? Great idea!
ReplyDeleteGorgeous!! I linked to your tutorial on Craft Gossip Sewing:
ReplyDeletehttp://sewing.craftgossip.com/tutorial-lattice-pillow/2011/05/06/
--Anne
Hi Jessica ...
ReplyDeleteSo perfect, beautiful and the most important thing that you stitched the tapes so neatly that no one can point out any imbalances ... very lovely... It might be my next cushion cover... Thanks for sharing...
hope you would like to pay a visit to me t
http://craftaworld.blogspot.com/
I am your new follower too...
Love
Farah
Love, love, love the texture!
ReplyDeleteI love the clean, simple look of these pillows! Thanks for sharing!
ReplyDeleteWhat a great idea. Love it tons. Can't wait to see what else you come up with.
ReplyDeleteSo cute! And very classy. Your tutorials are so straight forward and clear - makes almost think I could make one myself :D
ReplyDeleteStunning! I really like these pillows.
ReplyDeleteFirst off: I love these pillow. They're gorgeous! Second, I wanted to let you know that there's a website that has copied and pasted your entire post word for word, including photos without crediting or linking you. They did it to me too, and when I tried to contact them, they simply deleted my comments asking them to link me and remove the actual pattern. Perhaps if the other artists she plagiarized comment on their stolen posts as well, they'll get the picture and give credit where credit's due. Here's the link to YOUR tutorial:
ReplyDeletehttp://inthe-garden.blogspot.com/2011/05/lattice-pillow-tutorial.html
Those are beautiful!
ReplyDeleteSo, so clever! I love the lattice design with white on white.
ReplyDeletexo Jana
Wow... Really Nice Lattice tutorial. I chose to just make my own bias tape for these pillows. Nice Gift Basket Ideas to send gift for someone..
ReplyDeleteThank you for stopping by, we love to hear from you!