
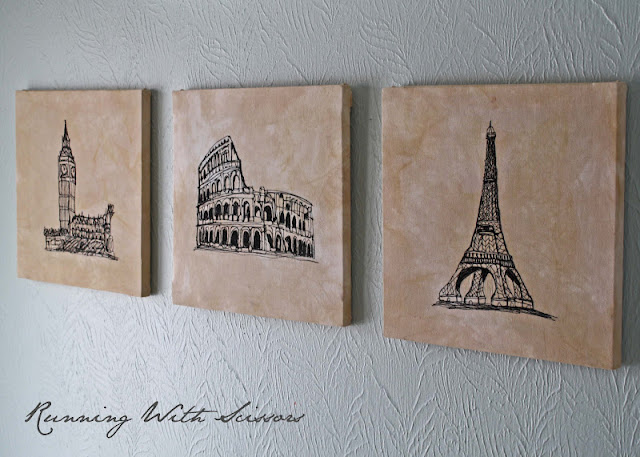
Tutorial: European Thread Sketches
12:06 PM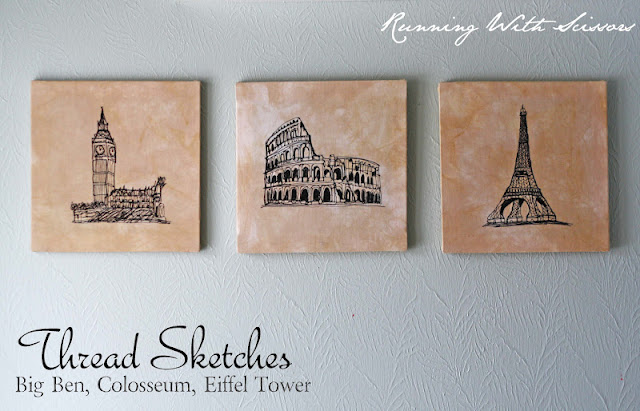
Original post of all three thread sketches here.
This tutorial shows how to make the Eiffel tower wall hanging.
This tutorial shows how to make the Eiffel tower wall hanging.

1. Cut canvas

2. Reinforce Back
I ironed freezer paper on the back to prevent the fabric from stretching, you could also use fusible interfacing or just starch the crap out of it over and over. Freezer paper was the cheapest, quickest option for me. You can purchase freezer paper at the grocery store near the tin foil.
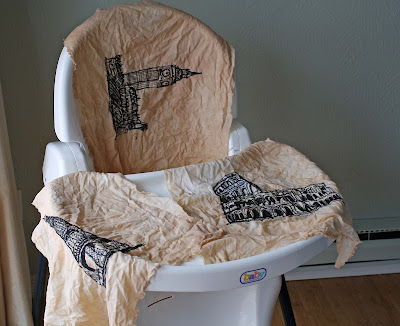
3. Print Images and Trace
 I googled the landmarks to find sketch images and printed them out to fill a regular copy piece of paper. I taped the printed image to my window, and taped the canvas on top.
I used a water soluble fabric pencil in blue to trace the image onto the canvas.

I used a water soluble fabric pencil in blue to trace the image onto the canvas.

4.Sew Thread Drawing

This video shows me sewing the eiffel tower thread sketch wall hanging.
I use a free motion presser foot which is just a large hole for the needle to go through.

Make sure you put your feed dogs down and decrease your stitch length to 1.0 for a quicker return on the stitch. I don't plan out the path I sew beforehand, I just wing it and go wherever. If I need to back track to return to a section, I just sew on lines already made to go anywhere I need to.
I sew at full speed and don't worry about it being perfect. Up close it's a sloppy mess, but from a distance it looks recognizable and like an authentic hand sketch.
5. Tea Dye
I wanted to age my white canvas by dying it with tea.
To get the crumpled, uneven dye look, I first got all three wet, crumpled them in a wad, and jammed them in a pitcher. You need a container where the tea can get down around the fabric, but tight enough to hold the fabric so it can't move freely.
 I poured hot, concentrated, regular cheap tea in the pitcher over the fabric and let it sit around 10 minutes. Next I poured it out and rinsed the canvases and let them dry.
6. Build Frames

I bought 2 1x2 firring strips for my frames and cut them down to make 14" square frames. I just braced the wood, then used glue and a finish nail gun to finish it off.
7. Stretch Canvas
 I lined up the image to be centered on my frame, then with a cheap hand stapler and shallow 1/4"staples attached the canvas to the frame.
I marked the center of each side on the frame and canvas and first stapled top and bottom centers, then both side centers. Next I stretched the canvas equally into the corners, then stretched and stapled between all the way around.
You could attach a hanger, but I just balanced the canvas on the wood frame for hanging.
Easy and it only cost me the $2 for the wood!
I wanted to age my white canvas by dying it with tea.
To get the crumpled, uneven dye look, I first got all three wet, crumpled them in a wad, and jammed them in a pitcher. You need a container where the tea can get down around the fabric, but tight enough to hold the fabric so it can't move freely.

6. Build Frames

I bought 2 1x2 firring strips for my frames and cut them down to make 14" square frames. I just braced the wood, then used glue and a finish nail gun to finish it off.
7. Stretch Canvas

I marked the center of each side on the frame and canvas and first stapled top and bottom centers, then both side centers. Next I stretched the canvas equally into the corners, then stretched and stapled between all the way around.
You could attach a hanger, but I just balanced the canvas on the wood frame for hanging.
Easy and it only cost me the $2 for the wood!


13 comments
Love love it! I have been thinking of trying free motion embroidery and coping one of my son's dinosaur pictures he drew onto a t-shirt for him. I just got to get confident!
ReplyDeleteTotally amazing.
ReplyDeleteJessica that was amazing!!!
ReplyDeleteSusan
I so want to try this, but I doubt mine will look anywhere near as wonderful as yours does!
ReplyDeleteYour video is totally wicked!!! You look like some kind of sewing rock star!!!
ReplyDeleteWow, how cool is that! It's amazing!
ReplyDeleteWould have liked to watch the video because I have no idea how to use a free motion foot but the video is blocked in Germany because of some music copyright issues... :-(
ReplyDeleteI am as impressed as everyone else. Absolutely stunning. Question: how did you manage to do it in one go? Did you need to plan ahead how you would cover all the stitches, or did you wing it? Thanks, Sabrina sburmeister(at)unc(dot)edu
ReplyDeleteHoly cow!!! That is CRAZY cool!!!
ReplyDeleteI have never been more in love with a sewing project. These are incredible. I absolutely LOVE them.
ReplyDeleteobsessed.
ReplyDeleteAwesome job
ReplyDeleteAwesome job
ReplyDeleteThank you for stopping by, we love to hear from you!