
Bookshelf to Pantry
11:05 PM


Our new house was built in the 80s, so it's older, and it doesn't have a pantry at all for the kitchen. Just the kitchen cupboards.


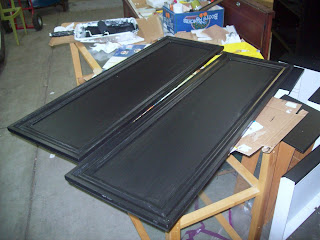
 My doors are made with 1/4" thick MDF, so they are pretty light and thin. The frames on each door are the cheapest baseboard ($0.57 per foot) around the edges.
This was my first time using a miter box, and it was only $15.00 with the saw and it was super easy and my mom was actually quite impressed with my miter cuts.

So to hold the shelf up, I used scraps from the 1x2s to create stoppers for the base plate. The base plate was 1/2" thick, so these stoppers were nailed 1/2" up from the bottom. That way when the base plate is on, the bottom is flat and flush with the sides and front kick plate.


There is a space between the kitchen and dining area that would fit a portable pantry.
So using this tutorial as my guide from Remodelholic, we took a free generic black bookcase to add more storage to our future kitchen.
Before:
Just a basic black bookshelf.
This is my Grandma's--she moved to Florida and we got it for free.
AFTER:
Not that different, added the doors and simple silver hardware,
little legs, and I'm going to add fabric to the back of the top shelf.


Here's the basic steps:
1. Nail a frame with 1x2 firring strips ($0.97 each) to the frame.

I chose to have a shelf on the bottom and top of the bookcase.
The wood is wider than the bookcase sides, so the inside of the frame makes a little ledge for those interior shelves on the side, but the outside of the bookcase is flush with the frame/doors.
2. Make the doors
 My doors are made with 1/4" thick MDF, so they are pretty light and thin. The frames on each door are the cheapest baseboard ($0.57 per foot) around the edges.
This was my first time using a miter box, and it was only $15.00 with the saw and it was super easy and my mom was actually quite impressed with my miter cuts.

To attach the baseboard to the MDF, I just used wood glue and clamps, no nails.
3. Make the base plate (if you want to add legs)
I cut a scrap piece of 1/2" MDF to make a base for the bookcase. The way this bookshelf is constructed, all the weight is meant to be spread between the 2 sides.
So to hold the shelf up, I used scraps from the 1x2s to create stoppers for the base plate. The base plate was 1/2" thick, so these stoppers were nailed 1/2" up from the bottom. That way when the base plate is on, the bottom is flat and flush with the sides and front kick plate.


Once these stoppers were screwed, glued and nailed to the sides, I needed to get the base plate ready.
I just bought legs at Home Depot. Each leg was $0.97, and each screw plate was $1.00
So here are the little screw plate packages and a few already on.


I decided to paint the legs while they were secure in the screw plates. When the little legs were dry, I just set them aside.
****What's nice about the screw plates is the fact they are universal. So if I thought these legs were too small and wanted to switch them out with bigger legs eventually, I could just buy new legs, paint them and twist them on.
Next I just nailed and glued the base plate in the bottom of the bookcase.

4. Sand and Paint
Sand down the frame. I didn't need to sand the doors since it was MDF and baseboard.
Then I used Glidden black onyx paint in semi-gloss. I did 2 coats.


5. Hang doors
Add the hardware handles to doors. I chose just simple silver small knobs.
The hinges were a little tricky with one person, so I had to recruit the husband to help.
Up to this point I'd done absolutely everything on my own. But I needed extra hands to help.
We screwed the hinges on the doors, then laid the bookcase on its back to screw the other half of the hinge to the frame.
I also bought a magnet closure for $0.80 each to help keep these light weight doors closed.


That's it! Pretty good use of a free bookcase.
This is pretty unstable as a bookcase, let alone with doors on the front, and raising it on legs. So we're definitely going to secure it to the wall when we move with L hooks so it won't tip forward.
I hope it will look like a cabinet rather than a bookcase with doors once I get it all spiffed up in it's environment. Stay tuned for the final resting place and further improvement on this.


4 comments
I was just scrolling through your post in my Google Reader, thinking it was really relevant for me, when it suddenly hit me that putting frames on my ugly linen cupboard doors would be perfect to make them fit better with the rest of the house. Thanks for the inspiration (that I really didn't expect)!
ReplyDeleteA-MAZING! I love it...such a great idea!
ReplyDeleteThank you for giving me the answer to my kitchen problems! I am going to do this project with a little kitchen desk next to it - saving big $$ compared to our quote from the cabnet store. I can't wait to show my husband this!!
ReplyDeleteWell, that's pretty cool! I like that you left the top and bottom shelves open.
ReplyDeleteThank you for stopping by, we love to hear from you!