Ombre Pleated Pillow Cover
6:00 AM
More throw pillows. These are for our basement/ family room.
I love using pleats to add texture, and prefer the geometric shape they create.
This technique uses contrasting fabric strips to create a pleated ombre texture, that is sewn down for added patterning in a zig-zag. I selected different shades of blue to create an ombre pattern in the pleats.
Ombre Pleated Pillow Cover
SUPPLIES:
-pillow form (16")
-pillow form (16")
-backing fabric (1 yard)
-scraps for colored strips
-invisible thread
1. Cut Strips:
For a 16" pillow, you'll cut strips for the pillow front:
Colors: 11 strips 2.5" wide and 17" long (for my ombre: 1 white, 2 of each transition color, then 4 of darkest)
Backing: 12 strips 2" wide and 17" long
I usually prefer envelope pillow covers, so for the back of the pillow you'll need rectangles:
17"x 12" and 17" x 10"
2. Sew Strips Together
Using a 1/4" seam allowance, alternate between a backing strip and your contrasting colored strips to chain sew them into a panel, making sure to sew your ombre pattern as you go.
3. Create Pleats
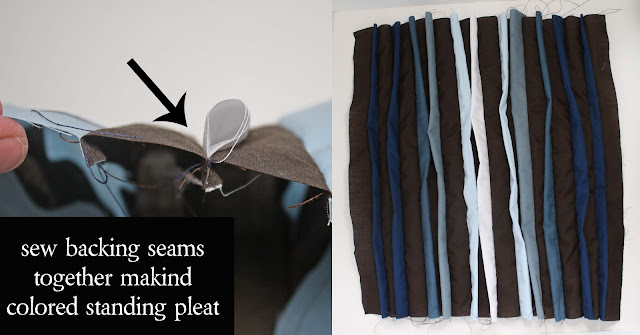
You'll next fold the panel right sides togther for each pleat you'll make. This will bring the seams on either side of a contrasting colored strip together, making the pleat fold on itself. Sew along the seams, conecting the two backing strips together and causing each colored strips to stand up off the backing layers.
Repeat across your panel, creating the pleats.
Her's a view of how the colored strips are sewn in a standing pleat while the backing strips become a base.
4. Create Zig-Zag Texture
Placing panel with strips horizontally, chalk in two lines, the first 3" from raw edge, the second 6" from first line or 9" from raw edge.
Using invisible thread, sew down these lines, holding all the pleats in the same direction.
Next, you'll chalk in two more lines, this time going the opposite direction from your first set. These lines will be 3" from the original lines.

It's a little tricky sewing against the pleats for the second set, you just pull each pleat right as you sew across it, keeping the panel as flat as you can as it will have a tendency to pull and twist.
So at this point you'll have the center zig-zagged and need to take the ends and sew them down in the opposite directions to finish off the ends of the zig-zag texture.
5. Press Pillow Front
I use my iron and press the pillow front along the length (up and down) of the pleats rather than across.
6. Complete Back to Pillow Cover
left: Take the long ends (17" long) of your envelope backing pieces and use 1/2" hem to one of the long sides on each rectangle.
center: Place right side of pillow front to right sides of envelope back pieces, overlapping them to create envelope opening.
right: Sew with 1/2" seam allowance around perimeter of pillow, curving at the corners.
You're finished!
You could use all one color on the pleats, mix prints, or play with different fabrics textures like sheer organza or lace. This pleated zig-zag technique could also be used on tote bags, backpacks, clutches and more!


9 comments
I really really love this!
ReplyDeleteLove this. Can't wait until we have boring couches to put some fun pillows on. And I am thinking my son needs one, he loves texture. And this would be a fun way to do some texture for him to play with.
ReplyDeleteAlso, I cannot wait for your class next week. It has been on my calendar, and each day I see it up there it makes me happy. I convinced my sister to come with me which will be even more fun! Thank you for doing the class!
Ohhh... I LOOOVEEE THIS!
ReplyDeleteThank you SO much for posting this tute!
I am going to try this tonight! Well... not tonight because I have the girls ministry class... but tomorrow night for sure!
You ROCK!
This is one of those pleated techniques that can be done on garments and home decor, and that makes it very very cool :)
ReplyDeleteWow! You make it look so easy! I love it!
ReplyDeleteLove it! Making it! :)
ReplyDeleteSo could you do this technique with the zig zag stripes on a shirt? Maybe use some grosgrain ribbon? Would it look dumb? Maybe just a couple of strips running up and down a shirt? I have been thinking of this all day long and wondered what you thought. Thanks!
ReplyDeletethis pillow is just fabulous! Those pleats are pefrection! I featured it as one of today's top patterns on the homepage at SewSet.
ReplyDeleteThanks again Jess!
I think about this,that its more easy,if color stripes before sewing are folded,ironed flat,and then sewn between base material stripes.
ReplyDeleteThank you for stopping by, we love to hear from you!