
Gallery Wall and Photobooth Plaque Tutorial
5:00 AM
So I'm late on the decor trends. But I decided to hang some pictures on the wall. We've lived here 1 year now and most of our pictures other than what little art we own is still in a box.
Also, we had recent prints of my father-in-law who recently passed away my husband wanted framed.
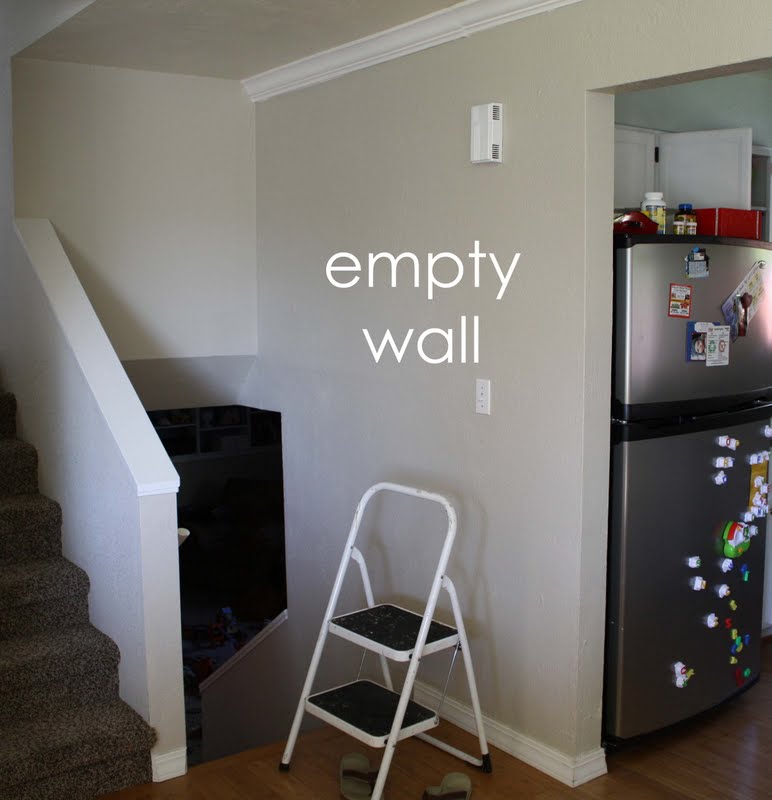
So I decided to make a full floor to ceiling gallery wall in the transition from our living room to our basement family room. It's a weird shaped wall with the stairs going down, and it's kind of out of the way so the gallery wall isn't too much of a focal point being in between rooms.
So first off, I collected a bunch of frames I already had, and found more at the thrift store for super cheap. Most were $1.00 or less. I pretty much threw away anything in the frame, although an elk cross-stitch I didn't trash, it must have taken so much time to make..
 ..I'm just not into elk or cross-stitch so maybe it will end up a white elephant gag gift this Christmas.


I tried to chose a variety of thickness of frames, detail, and shape.
With all the chaos of the gallery wall, the frames ought to be uniform in color I've seen.
So I cleaned the frames, then using spray paint primed and spray painted them all white.

To figure out how to configure my wall, I used paper templates by tracing the frames and using painter's tape to arrange the frames on the wall. As the wall filled, I readjusted these a lot.

Then I hung the frames.
The paper layout made it nice when I actually hung the frames, because I could hammer the nail right through the paper where I wanted the frame, then just tear the paper away and plop it on.
Now I need to fill the frames.
But in the meantime, here's a little tutorial if you want to make a photo plaque to hang flush on the wall. This would be good for small photos to fill small holes or gaps in your gallery wall.
I was needing some way to squeeze photobooth photos in the mass of frames.
So here's the quick project:
1. Take a scrap of wood the size you need. I used a 1x3 which is 2.5" wide. I cut it 7" long.

2. To create the hanger, drill a hole in the back of your scrap, about 3/4 through the wood. You don't want to drill all the way through the wood.

3. Paint your block. I just used acrylic craft paint and let it dry.
Then I took my photobooth photo and mod podged it to the front of the block.

4. To make the block hang on the wall, but be flush against it, you need some way to hang it.
So I took my hot glue gun and filled the drill hole with hot glue. I took a small nail for picture hanging and used it to jam all the hot glue in the hole while it was still hot and melty. I held the hail straight up out of the hole, with the nail head anchored to the bottom of the hole until the hot glue cooled and set.

Then to hang it, you just line it up, stab it into the wall a little, cover the front with a towel and hammer it all the way in.

I loved this photobooth photo of my in-laws from the 60s.

So quick and easy!
Hopefully I'll figure out the rest of the frames soon to show you the completed project!


22 comments
Love seeing the point shoes!
ReplyDeleteGreat idea to use the block!
ReplyDeleteFantastic idea to use paper and then nail straight through the paper! Much better from the detailed and laborious math calculations I've been using!
ReplyDeleteAlso, thanks for the photo block tip. I love it!
The wall turned out amazing and that is a fun idea to incorporate the photobooth shots. I also love the point shoes!!!
ReplyDeleteLOVE the white frames.... and those beloved ballet slippers too ;)
ReplyDeleteThis looks great! Love thrift store frames!!!
ReplyDeleteI love your wall of memories!
ReplyDeleteBeautiful ideas!
ReplyDelete(It was a deer, rather than an elk that was in one of your frames.)
Have a great Sunday and a great week...........Denise
I'm a new follower, just saying hi, but also to say what a great idea for the gallery wall. We have a similar shaped wall going up the spiral stairs in our house and this looks like just the sort of thing it needs!
ReplyDeleteThat looks great and I love your paper planning!!!!!!!! I have SO many holes in my walls from changing my mind about placement.
ReplyDeleteThanks Rocky Mountain Homemaker, I had a feeling I had no idea what animal was in that frame...just a deer.
ReplyDeleteI love your wall! How do you hang the pictures so they are flat?
ReplyDeleteI love the photobooth pictures and I love your idea for the tiny frames.
ReplyDeleteBut I think my favorite thing is the point shoes.
a lot of them aren't flush against the wall, but I tore off the "kickstand" for the frames that were made for hanging or free standing, so that helped to remove that bulk from behind the frame.
ReplyDeleteThat looks fantastic! I want to make a gallery wall in our master with just items related to us. Thanks for the tute on the photobooth pictures I can't wait to add that to the mix.
ReplyDeleteI love the cross stitched elk. He's kinda cute. :o)
I am SO SO glad you posted this because I am planning to do the same thing on our wall........ PROJECT TIME!
ReplyDeleteI'm so happy to see the return of the ballet slippers!! This wall looks amazing!
ReplyDeleteDid your frames come with glass? I can't tell if there is glass in them on the wall or not.
ReplyDeleteAll have glass except one, I accidentally broke the glass and plan on displaying my son's art in that one.
ReplyDeletethis is so timely and perfect. I have some pictures of my Activity Day girls and their dads that I edited in a photobooth style and have been trying to figure out how to display them.
ReplyDeleteLOVE IT!!!
ReplyDeleteThose pictures are beautiful!!! Especially the first one.. A very good description too......
ReplyDeleteFlights to Harare,
Flights to Dubai,
Flights to Sydney,
Thank you for stopping by, we love to hear from you!