
Tutorial: Mushroom Stool
3:33 PM
As an experiment I took junk around my garage to make a little stool or ottoman for my kids.

I hacked off the bottom of this newspaper post that was laying on the side of our house, and ended up with a cute little reading stool!
.jpg)
The original inspiration was from Anthropologie's stool that's actually crocheted and $168.00

That seemed really expensive, so I thought why not try to make my own version for free?
I thought it would be perfect in my kid's room that is keeping my original red/ turquoise plate but has steered woodland on the girl half.

This was really easy to make, and the shaping of the fabric for the mushroom dome is so simple...no measuring or calculating involved!

It's tall enough to work as a stool for preschoolers, and as a baby ottoman for adults.
.jpg)
The stool leg has the texture from the pressure treated post that I liked and just left.

MAKE YOU'RE OWN STOOL!
[it seems like a boatload of steps, but it's actually a quick project I did in an afternoon between lunch, messes, chores and making dinner...just lots of little, quick steps]
SUPPLIES:
-circle wood base I took a scrap of 1/2" melamine coated plywood and cut a 13" circle with my mom's band saw. You could also just buy a stool seat.
-post: I just had the hunk of 4x4. It would be cool to use an actual hunk of tree trunk
-3" thick foam
-batting
-red canvas
-white fabric paint
-felt scrap for bottom of wood base
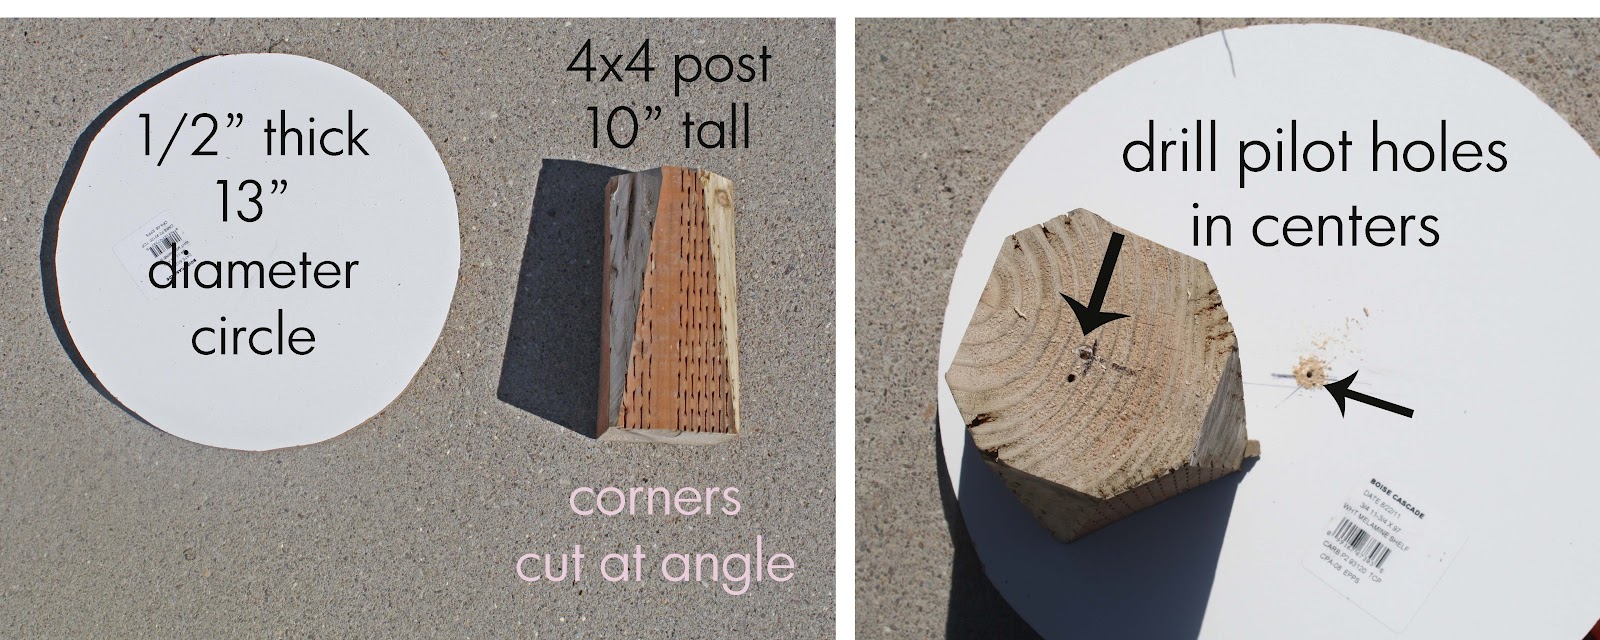
1. Cut your circular seat base, at least 1/2" thick and I cut mine 13" in diameter.
For the leg of the stool, I cut 10" tall 4x4 post chunk. To give it a dome shape, I cut off each corner at an angle by tilting my table saw blade 45 degrees and running the block through at a 8 degree angle so it cut off more at the top and tapered to the full base.
2. Measure center of leg and base and drill tiny pilot holes in each

3. Screw through base so a little screw is poking out and use that to guide screw into leg pilot hole to make sure both are connected at their centers. Reinforce center screw with other screws.
4. Paint the leg of stool. I used white for the base then dry brushed ivory and a little brown for a mottled, natural look.

6. Using a utility blade or scissors, cut off any excess foam
7. Trim up foam to be even with the wood base, and slightly taper toward the top.

9. Take a large scrap of batting and drape over whole mushroom.
10. Wrap batting around and underneath wood base. Staple the batting with cheap staple gun and 1/4" staples

12. Start shaping the canvas by pinching a side of fabric and pinning at the wood base. Next take a similar pinch opposite your first. Then pinch and pin across from that, so there are 4 pinned tucks at the quarter marks around mushroom. Then in between gather any excess fabric for 4 more little tucks.
13. Draw with tailors chalk or ink the curve of your mushroom to help guide your dart sewing.

14. Carefully remove canvas, keeping in your pins.
15. Sew around your canvas along your chalk lines to make all the darts. At the top of the mushroom, so eventually right off the fabric for a smooth top.

16. Fit it back on the stool inside out in case you need to adjust any of your darts for a good fit.
17. Trim all the tucked seams, here I just serged it all off.
18. Place your red cover on right side out and center on batting/ foam. Start with one edge and staple into wood base. Stretch canvas tightly around the opposite side and staple. Repeat with the other two quarter marks to get it tacked down tight in all 4 directions.

19. Finish off the canvas stapling all around the base.
20. Trim off any excess red canvas and hot glue felt scrap around your unsightly (and in my case sloppy) staples. I also added the felt to the wood base with Elmer's glue.

21. Paint your white dots using white fabric paint. I used the white tailor's chalk to kind of sketch where I'd like them to be. I prefer a mix of sizes, but a uniform dot would be easier if you had a little circular sponge.
FINISHED!

DISCLAIMER!
The one thing that isn't amazing about the mushroom/ pedestal design for this stool is the fact it can obviously tip a lot easier than a regular 3-legged stool.

As this was an experiment with free junk around my house, it works and I think I may add another 1/2" thick circular base on the bottom of the leg to help give the whole stool a wider foundation. Maybe paint the added base green to mimic grass or something. It's a lot more stable on a rug or carpet than the hardwood flooring too.
If I made another one, I would probably scout out a thick trunk of a tree with cool texture and paint the bark white for a solid, natural foundation. Or buying a 6x6 post would make your base bigger as well using my same methods.

Outside it actually looks like a little mushroom because my lawn is so long and I've put off mowing it, which was smart as it snowed 3" this morning!
Happy Shroom Making!


15 comments
Oh very cute!! I made mushrooms stools last year? maybe before that and they are still is use daily! http://likemamalikedaughter.blogspot.com/2010/11/back-to-basicshomemade-happiness.html
ReplyDeleteReally cute. You come up with the best projects.
ReplyDeleteThis comment has been removed by the author.
ReplyDeleteIt looks great jess!
ReplyDeleteI made a mushroom stool using a concrete form from Home Depot as the base. It works because it is light weight and sturdy so you don't have to worry about little kids squishing their toes or fingers.
ReplyDeleteWell, I am now a follower of your blog after staying up till 12:33 A.M. checking out all your AWESOME stuff! BTW, LOVE all the pics of your son modeling your creations..he looks like a little GQ!
ReplyDeleteThis is one of the cutest things I've seen in a long time! I don't know how I got here but I love your blog and your creativity, I'm a new follower.
ReplyDeleteI would love it if you'd share this adorable project at my Weekend Warrior Link Party: http://www.askannamoseley.com/2012/04/weekend-warrior-47-features.html
Anna
www.askannamoseley.com
So cute! I'm going to have to try this.
ReplyDeleteIs it wrong that my favorite picture is the one with your son demonstrating the tippy-ness of it? It's such a classic kid thing to do and you captured it beautifully!
ReplyDeleteLove this! It is absolutely adorable.
ReplyDeletebut I must say I am a little worried, especially because you have still-teenie little one: pressure treated wood is really, really aweful stuff and should not be touched (or licked, or chew on as my own 8 month old woudl do). So having the stem made with PT wood would be a big no-no in my house (and I am usually not a total freak regarding green-only things..)
You might want to either change the PT wood with regular wood or give it an extra thick layer of paint.
Sylvie: Thanks for your concern, and the the stool is actually on the shelf for now--I am determined to find a real stump to make it look more woodland authentic and replace my junk pile substitute. But my kids have also never chewed on furniture--definitely tried out play-dough and crayons, but we've been lucky and they've never gone to the crib bar or anything... maybe they just have soft teeth or something. :)
ReplyDeleteBAHAHAHAHAHA for some reason that before picture really cracked me up. Before: mailbox post. LOL.
ReplyDeleteI noticed the above comment and let me say... I envy you. My kids are a pair of beavers, and the four year old and the 16 month old have done a number on cribs, chairs, THE FREAKIN WINDOWS I KID YOU NOT.... like seriously, you'd think I never fed the little monsters.
This is too cute! This would be fun in an outdoor fabric at a campsite!!
ReplyDeletelove this! I will probably try with a stump or toxic-free wood...
ReplyDeleteQuestion: where did you get that ADORABLE woodland play mat/rug? I love it!
Thanks Carissa:
ReplyDeleteI made the rug, details here: http://projectsbyjess.blogspot.com/2012/05/woodland-childrens-rug.html
Thank you for stopping by, we love to hear from you!