
How To Finish Leather Edges
4:12 PM
I have been trying to find leather for months for a little project I'm revealing later this week.
I thought the best place would be to get a leather belt from the thrift store, but haven't found any I had in mind.
I'd also been drooling over this gray semi aniline hide that is on sale.
If you saw on my instagram {@runningscissor} I bought a cat pee couch a few months ago and thought this gray leather would be perfect to re-upholster.
Luckily, I got talking with Jennifer, the rep from leather hide store and she's graciously allowing us to host a giveaway for you guys!!
I got a 13 sq foot hide in dark copper mountain saddle.
The remnants are nice because you can see a picture of the actual piece on their website to get an idea if the dimensions will work for your project. The straight edge on this piece was perfect for my plans, and I could cut it more efficient than other remnant hides.

Leather Hide Store were great to work with. I got a samples before I decided.
I was looking for a lighter warm brown.
They shipped the samples and my order really fast which is always nice.

The ones I was looking at were soft and around 1.0 mm thick, more on the thin side as I'll be using my remnant hide for accessories and hopefully clothing!

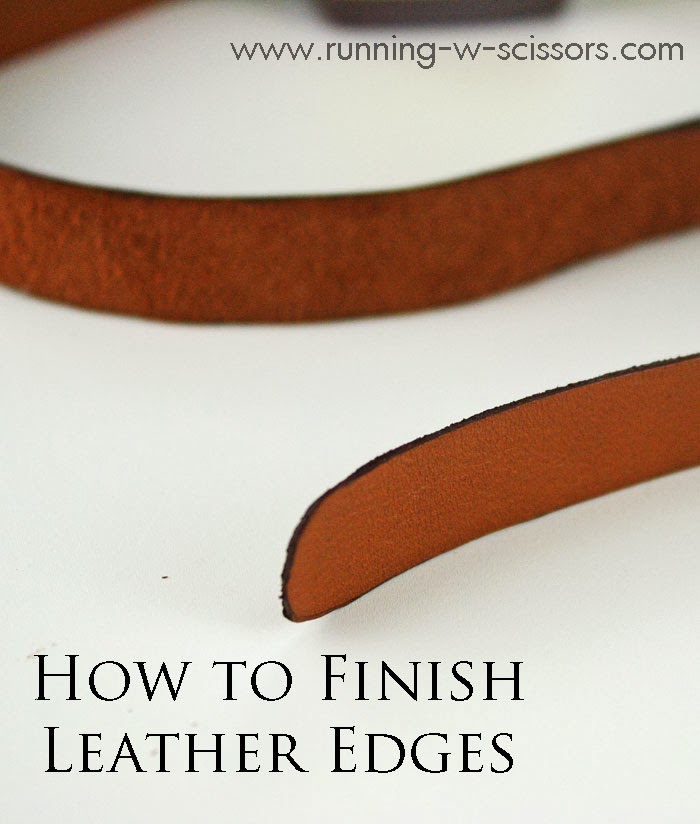
HOW TO FINISH LEATHER EDGES
So next, I wanted to learn how to finish the edges of the leather to look professional.
It seems lots of DIY leather projects can look homemade with the fuzzy underhide on the edges.
So I did some research and found Bob. He has a video here on finishing the edges of thick, stiff leather.
Supplies:

I bought these supplies online from www.leathertandyfactory.com
Bevel Edges
To round the edges, you need to bevel the top and unfinished side.
I bought the smallest beveler, size 2.
It worked well on the austin smoke upholstery leather, but I didn't really need to bevel the softer, thin stuff.

So for my softer leather, I did the following:
1. The natural hide back has the fuzzy texture that sticks out even when you cut the edge with a rotary blade.
2. Since I couldn't bevel, I needed to trim the backing at an angle.
I did quite a bit with a straight razor, then finished using scissors on the edge to barely trim the excess fuzz away.
3. Wet the leather edge with water, or the gum tragacanth.
Quickly rub the wet edge in the edge slicker to burnish the leather.
As the gum tragacanth dries from the heat and friction, it makes the edge smooth and shiny.
4. The Edge Kote is a flexible sealant to the edge.
I applied it with q-tips and if any got on the finished side of the leather, I quickly wiped it off with a paper towel.

Once dry, it's ready to use!

Can't wait to show you what I made with these leather strips!!!


11 comments
Thanks for the awesome tutorial! I also have a love for Edge Kote once I realized it could fix my coach purse! http://warfieldfamily.com/2013/02/how-to-fix-a-leather-purse-strap/
ReplyDeleteI got the idea from looking at my purse for all the places it was just raw edges. Glad you were able to save your coach!
DeleteCan't wait to see what you made. I've been dreaming of some belts. We'll see when I actually get around to sewing them, but the edge kote is a great idea.
ReplyDeleteThanks Erin, I actually think it might be something you'd rock.
DeleteI've been trying to find a good leather shop since I've just run out of most if my leather! Nice giveaway!
ReplyDeleteI've been impressed with their business. I guess they were only on ebay for over 8 years before hosting their own site and had really high reviews on ebay for customer service.
DeleteI love leather, but I've never done much in the way of edge finishing... I'll have to try this out next time I'm working with it. =)
ReplyDeleteI think it makes it look more professional, the edge slicker kind of squishes it flatter and thinner in addition to making it shiny and smooth.
DeleteThanks for sharing this info on finishing leather edges! I've linked to it over at Craft Gossip: http://sewing.craftgossip.com/tutorial-finishing-leather-edges/2013/12/17/
ReplyDelete--Anne
Thanks so much Anne!
Deleteexcellent info! :)
ReplyDeleteThank you for stopping by, we love to hear from you!