
Ride Like The Wind Bullseye!
1:27 PM
You can obviously buy Bullseye, but this one was inexpensive, (using scraps I had) and the legs have wire in them so Bullseye can actually stand on his own.

This softie toy is the perfect pal for Sheriff Woody.
The perfect size for going on a horse ride.

Or he's pretty cute on his own.

Fleece or Felt Bullseye
-free pattern and tutorial-
SUPPLIES:
-tan fleece/ felt scraps or 1/4 yard
- dark brown fleece/ felt scraps
-peach scrap for nose
-white scrap for eyes
-scrap for saddle blanket (mine is gray fleece)
-leather scraps *optional you could also use fleece/ felt for saddle
-small bag of polyfil stuffing
-1" wide elastic: 2 pieces 2.5" long each
-2 small gold D-rings (find them near the buttons/ notions in craft store)
-1" strip of velcro (could also use snap instead)
-thick wire (I used 9 gauge and doubled it, needing 85" total)
-pliers, wire cutters, glue gun, permanent marker
1. Print Pattern and cut out pieces
PRINT PATTERN HERE
click here to jump to full tutorial
2. Cut out pieces from all your scraps
Make sure when you cut the body to add the extra seam allowance beyond the trace line as shown below. Also pay attention to the pattern pieces that have folds.


3. Sew Body
On one of your body pieces, pin the tail facing in.
Pin the hair along the head, stretching the curve as you go. You may want to snip the curve in the seam allowance to let it stretch around the head better.

Make a horse sandwich, layering the other body piece on top of your pinned hair and tail.
Sew on your trace line, leaving the nose and belly open.

4. Sew On Nose
Take your peach mouth pieces and sew along dotted sides of pattern with 1/8" seam allowance.

Turn mouth right side out. Place in the nose of your body that should still be inside out.
**Make sure your nose seams are going across and not up and down, as this mouth seam creates the horizontal line for Bullseye's lips

Pin the mouth in place.
Carefully sew around the nose. You'll basically be sewing a small circle, this is probably the trickiest part of the whole toy.

This is how I fit it in my machine to sew. I sewed a 1/4" seam allowance, guiding on the edge of the presser foot.

5. Finish Body
Snip the seam allowances, especially on the curves and snip bottom 2 corners.

Turn Bullseye right side out through the hole you left in the belly.

Stuff body with Polyfill until pretty firm.

To close the body, hand sew the belly hole shut.

6. Make Legs
If you are doubling your wire, cut 4 pieces 21-24" long.
Twist 2 wires together tightly.

Take your 2 fleece/ felt leg strips and fold in half and sew down the open seam with 1/4" seam allowance.
Next, turn your 2 tubes right side out. This can be a pain. I used a surgical suture clamp, but this is a good idea here to sew a ribbon in the tube to help turn them right side out. I wish I'd remembered that tip before I was turning them one inch at a time with my clamp.

Thread your twisted wires through your tubes, you should have wire sticking out both ends.

Using pliers, curl in about 1" of wires in a spiral on all ends. These are the horse feet to help him stand.

Bend your spiral to make the foot on all ends.

So now you have a front and hind leg. Bend them in the middle to create rainbows for the legs.

Using the markings on pattern, snip 4 small holes on the bottom of the horse belly. Mine were maybe 1/4" long, just enough to stretch around the wire spiral feet.

Thread your leg rainbow through the two slits for both front legs and back legs.

Once your legs are in, adjust the body on the legs, by shoving the arch of the rainbows up into the body for support. I bent the arches slightly at the "hips" so the arches bent toward each other in the middle of the body.
My finished legs coming out of the body ended up being 5-6" long.

I used leather scraps for the saddle and stirrup, and grey fleece for the saddle blanket. You obviously could use felt/ fleece for the whole saddle.
If you do use leather, make sure you have a leather needle in your machine to make things a lot easier.
Start by layering the saddle blanket on the bottom, stirrup strip, then the saddle on top.

Making sure you sew through all 3 layers, sew around the saddle.

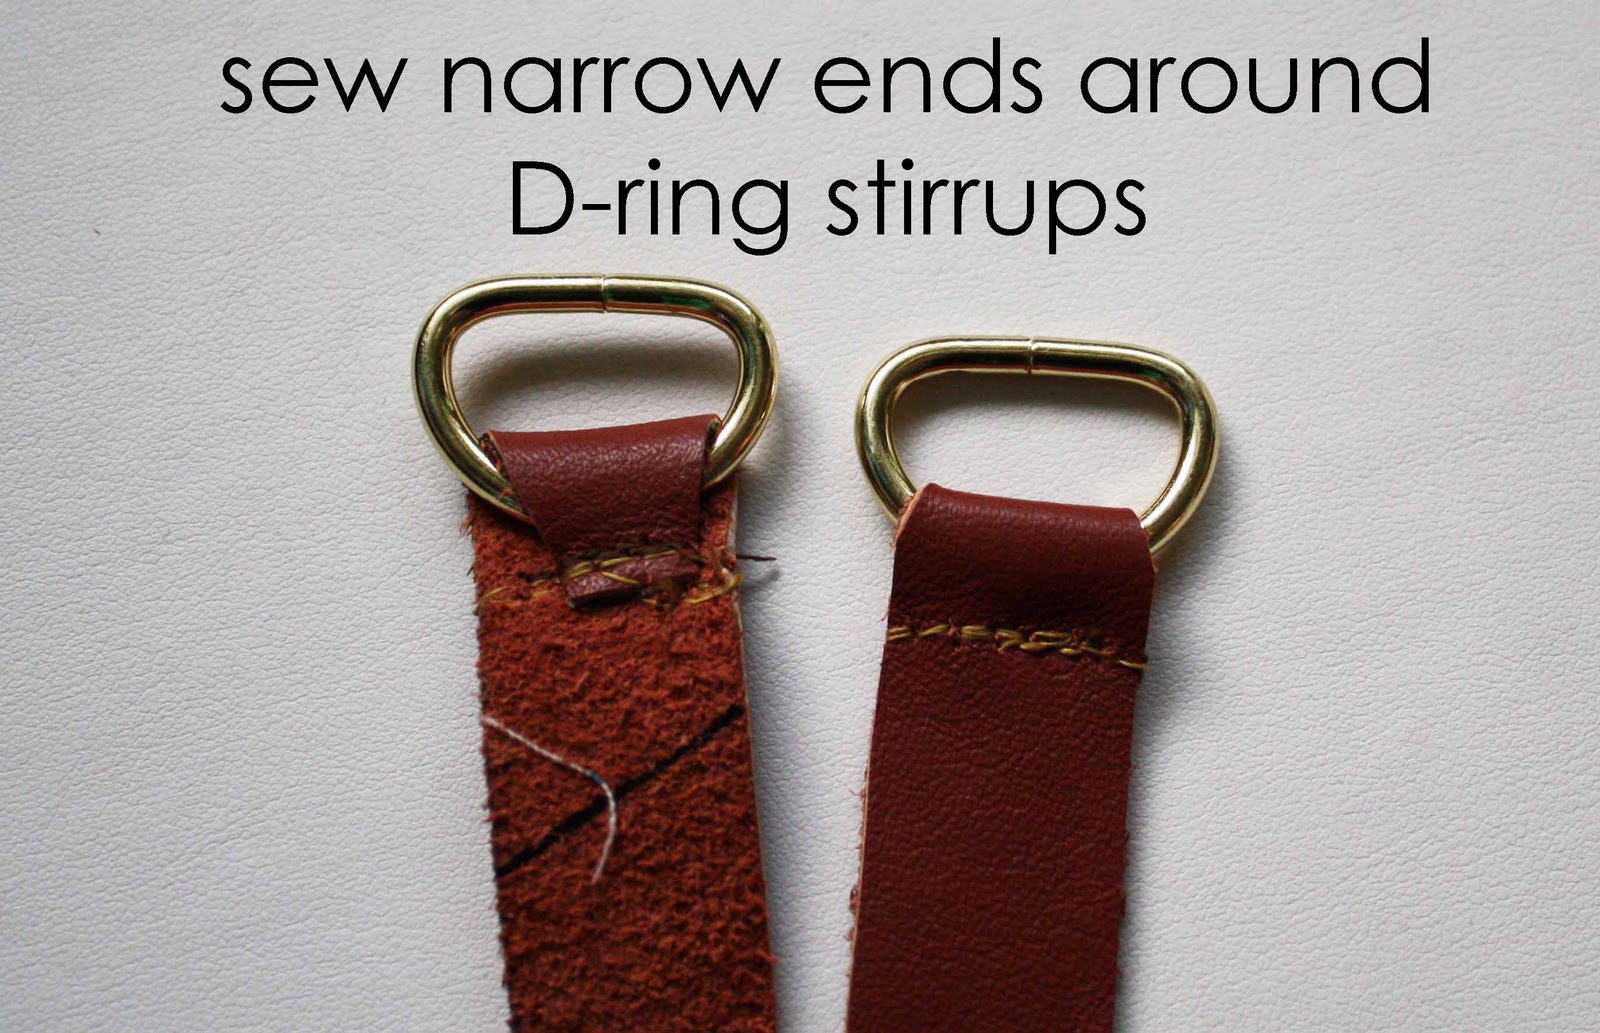
Take your little gold D-rings, and fold the narrow ends of your stirrup strip around them and sew across.
Optional: I added decorative stitching around the edge of the saddle blanket.

9. Add Saddle Attachments
Taking the 1" wide elastic, cut 2 strips 2.5" long. On the saddle blanket there are little square tabs to sew your elastic to. I just sewed around the tab in a square.

Next, take your 1" bit of velcro and sew a side to each end of the elastic. This way, the saddle stretches around the horse belly to stay tight. You may want to test it on your horse and trim the elastic to make sure the saddle fits snug.
Also, make sure you sew the velcro on the top of one elastic side and on the bottom of the other, so they will stick together with the elastic overlapping.

10. Make Hooves
Taking your 4 hoof pieces, first sew the two straight sides together, making a cone shape. The hole in the top is where the leg inserts, the circle hanging off is the bottom of the hoof.

Next, fold the circle portions up under the cones to make the complete hoof. Sew using 1/8" seam allowance around the circle, starting at one side of the fold and going around to the other side. You'll basically sew a "U" shape to connect the bottom of the hoof to the cone sides.
When sewn, flip the hooves right side out.

11. Face Details
Take your ears, and fold them in half and sew along the bottom.
Cut out your white scraps for eye balls and add the black pupil with a permanent marker.
**You could also sew tiny black beads, buttons, cut out black fabric, etc. but I took the easy route with just stippling a black dot in marker. Fast and easy.

12. Hot Glue Face and Feet
At this point I just hot glued the eyes and ears on the face. I used a pin to help evenly squish the hot glue beneath the tiny eyes. The ears I just glued to the side of the head eyeballing it.
Next while you have the glue gun hot, glue the hooves to the ankles. I found it worked best to put the hoof on, then put glue along the ankle, then push the hoof into the glue, a section at a time.

I also sewed brown nostril rainbows on the nose, but you could also use a thin fabric marker.
That's it! He's finished!
I thought it would be cute to add horse shoes, but then I realized the real Bullseye just had plain brown hooves to write ANDY on, and I was getting close to the Christmas deadline.
But just another idea.
Hopefully your little Toy Story Fans will love their own Bullseye horse.


35 comments
Adorable, Jess! Thank you for preparing a tutorial while you were at it. I'm sure he'll find lots of playtime.
ReplyDeleteYou're such a thoughtful mom! Not to mention generous blogger! My kids don't know toy story yet, but they do like horses, so I may attempt this at some point. Thanks for the tutorial!
ReplyDeletePrecious! Perfect for my grandson! Thank you for sharing. You are so creative and I do not think your son could have loved the store bought one bit more. Oh so cute!!!!
ReplyDeleteSo cute! Such a creative idea. Thanks for sharing!
ReplyDeleteOh man, that is adorable Jess!!
ReplyDeleteThose wire legs are pure genius.
And I can't wait to see your entry for this Project Runway this week!
Whoa! You did a super fab job!
ReplyDeleteNow that is some cuteness right there! The way you did the legs is awesome. I would have been cussin and screaming as I hand sew on to tiny legs if I had tried to come up with that. :P
ReplyDeleteHe is adorable!! Love it pardner!!
ReplyDeleteHugs,
Gina
Oh my God! This is unique! I cannot take my eyes off it because it is fantastic! Fabulous tutorial and truly original creation! It was a pleasure dropping by at your place!
ReplyDelete(P.S. I am visiting from Skip to my Lou)
AWESOME!!!!! You are pretty much amazing.
ReplyDeleteJessica thank you very much for the tutorial of the horse, I really like and you've done a good job.
ReplyDeleteroser
O. my. Gosh! This is SOOO cute! I've been having a good time making softies of late, but, I've yet to attempt a 3D one. I have one planned, but I haven't quite gotten to it. (Baby gift making is taking priority right now. lol)
ReplyDeleteI'd love for you to come link this up to my linky party! www.littleEme.blogspot.com
That is a Hilariously excellent horse!
ReplyDeleteand a beautiful tutorial
Many Thanks and all the best for 2011
Love it Jess! Great tutorial as always!
ReplyDeleteWow! Excellent job!!
ReplyDeleteHe is amazing! What a great job!
ReplyDeletexoxo,
Amy
Three words: so stinking cute!!!
ReplyDeleteLove it!! I featured you today on Today's Top 20!
ReplyDeleteAmanda
todaystoptwenty.blogspot.com
Perfect for my grandson! Such a creative idea. Thanks for sharing!
ReplyDeleteSherman Unkefer
Aww! I love bullseye! I wanted to buy one for my kids for Christmas but they didn't want him...and no way my hubby was letting me sneak him in with the $50 price tag but I will definately be making one! Thank you so much for the pattern! I can't wait to make it!
ReplyDeleteThis is such an awesome project!! Thank you so mcuh for the tute! I'm going to have to attempt it soon. The wire legs are brilliant! Thanks so much for linking up! I hope you'll stop by Tute {Yourself} Tuesday again next week!
ReplyDeleteThis is seriously BEYOND adorable!!! My son got the same Woody doll for Christmas...only his is Bullseye-less! Thanks for sharing!
ReplyDeleteAwesome! Thank you for posting, my little guy is going to love this!
ReplyDeleteBullseye is adorable!
ReplyDeleteYou are amazingly talented!
I'm so glad you found the love of your life.
WOW! That is awesome. Great tutorial! I'd love to have you submit this to the M&T Spotlight: http://www.makeandtakes.com/spotlight
ReplyDeleteSuch a great design!! Your project has been featured today at Craftastic Monday. Stop by & grab a Featured On button - thanks for linking!
ReplyDeleteOh my goodness, this is fantastic! My son just got Woody and Buzz for Christmas. He is completely obsessed with Toy Story. I see a sewing project in my near future, lol. Thanks for the great tutorial!
ReplyDeleteIn case you missed it, I wanted to let you know that I featured you yesterday! :)
ReplyDeleteLittleEme.blogspot.com
Wow, you did a great job! Good for you figuring out how to make a Bullsyee yourself. I know he's going to be played with and loved a lot. Thank you for joining us at A Crafty Soiree. I love being inspired by the participants. I hope you'll come back next week too, we love to see familiar faces!
ReplyDeleteCreative, Artisic, Original,
ReplyDeleteWoo Hoo!!! You did an amazing Job!
And to top it off you are sharing a tutorial and free pattern!! I know this Momma is a happy one! My children are going to LOVE this!
Thank you for all that hard work!
This is amazing! It's going into my "to-do" list. Thank you for sharing!!!
ReplyDeleteThis is super sweet, WOw how clever! I love this and is a must to do.
ReplyDeletethank you so much for this tutorial, my 5 year old son is crazy about toy story and would love this.
love emma x
Just posted about this on my blog:
ReplyDeletehttp://mamahoot.blogspot.com/2011/05/bullseye.html
I made one for a friend's son - thanks so much for such an awesome tutorial!
Thank you so much for the awesome tutorial! I used your pattern as a base to make one of my own for my little man!
ReplyDeletehttp://creativelystartingsomewhere.blogspot.com/2011/08/crafting-for-kiddo.html
How did I ever miss this? I am so in love with it Jessica! Amazing!
ReplyDeleteThank you for stopping by, we love to hear from you!