
Outdoor Fabric Lantern Chandelier
12:14 AM
Last summer I made these DIY shade sails. I have been meaning to make a light source/ chandelier for some time to kind of ground an area for the patio dining set. Lots of ideas have been thrown out. I found my main challenges were a) something that could be outdoors and b) something that was sheer enough to allow the light through
I knew the light source would be Christmas lights, and I ended up deciding the chandelier would need to be from fabric. I always love paper lanterns outdoors, and wanted to somehow create a weather proof outdoor fabric lantern.

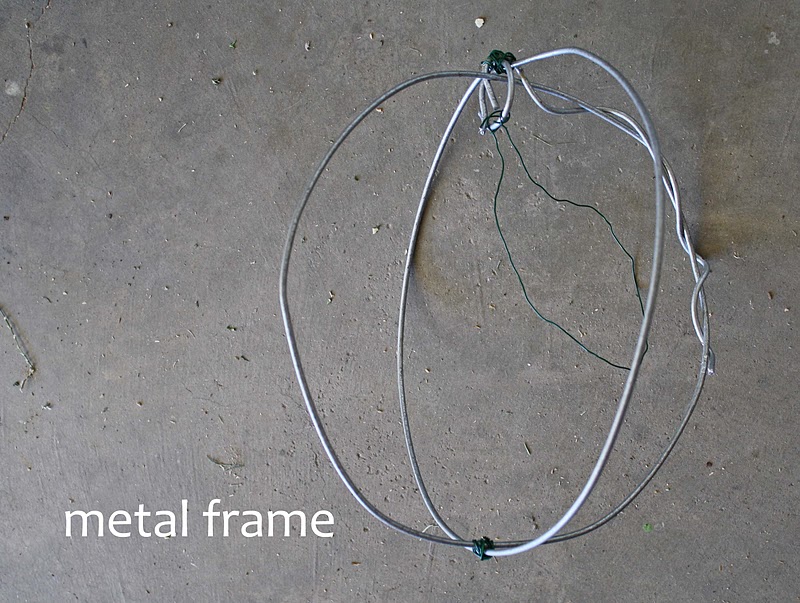
I ended up making a metal frame, and sewing a removable/ washable fabric cage around it.
I added ruffles vertically around the lantern/ chandelier.
It makes it look a little nicer in the day...

...and adds drama and texture to the light at night.

The challenge was finding a fabric that was:
sheer.
stretchy.
light colored--white or ivory.
wouldn't fray.
So all these elements combined in one moment of luck rummaging the junk fabric bin at Walmart. They have mini bolts of 5 yards of mostly "unknown fiber" fabrics for only $5.00. So $1/yd brings some nasty fabrics, but also some interesting mixes you wouldn't find elsewhere, like my sheer stretch knit.
So it was an exciting day to find that, and for so cheap!
So to make your own outdoor lantern:
I first made the metal frame. My wire is supper thick. I don't know the actual gauge, I bought it at Home Depot in the fencing section, so I assume it's the same gauge as a chain linked fence. I couldn't snip through it but actually had to saw each piece with a hack saw.
I basically made two circles and used floral wire to connect them perpendicularly from each other to try to have a simple sphere shape.
Next I needed to draft the pattern for the fabric cage. I took the frame and held one down flat against paper, then rolled it to the center, tracing the frame, then rolled it to the other end to trace the full length of one side.

Then I was able to cut it out and use it as my template for the fabric.

I didn't take any photos of the steps from here because once I got going I was sure it would be a flop.
But it turned out!
Basically I cut 4 of the tear drop shapes, making sure the fabric stretch was going around the lantern from side to side and not up and down. I sewed two together, so I two halves. Then I cut the fabric in 3" strips and with the highest tension and longest stitch length sewed a stitch in the center to ruffle them up.
With lots of ruffle strips, I then just sewed them on the tear drop cage halves, up and down until it looked full. I sewed the two halves together, leaving on side open from about half way up to the top. Originally I planned to attach velcro to the open seam for an easy close, but had to unpick the velcro because everything needed to stretch to fit it over the metal frame.

So I just closed up the one seam with small safety pins around the cage.

To hang it, I just used mason line and safety pins to attach it above. The hole in the top of the lantern is where my string of Christmas lights enter the lantern, then they're just in a tangled glob in the belly of the lantern to try to light up the whole thing.

The light is obviously really soft being just Christmas lights, you couldn't read with it or anything, but it adds such a cool atmosphere to the backyard and the dining set to have a fun ruffled outdoor lantern.
Kind of a romantic little place for dinner.
I love it because it was less than $5.00, is weather proof, and I can remove and wash the cage when we take it all down for the winter.


4 comments
Are you serious?? Is there anything you can't do?
ReplyDeleteI've just found your blog and think it is absolutely amazing! I am now your newest follower. Kat :-)
ReplyDeleteWay to go, Jessica! Way to use your skills and talents to make great outdoor rooms for your family! It looks great and the total budget is astounding. Just shows what can be done.
ReplyDeleteI am inspired, by your efforts, to try jazzing up my little square of a back yard (I'm an apartment dweller), to better use that space.
Again, way to go!
I LOVE this idea! Have soooo enjoyed watching your backyard take shape!
ReplyDeleteOne suggestion: The latticework you took down looked like it added some structural support to the posts. I'm thinking they are going to bend and loosen over time. Once the vines take off they will need lateral bracing. You might consider tying them together at the top or lower down with 1x6's or 2x4's or something.
Thank you for stopping by, we love to hear from you!