
Dresser Make Over
4:04 PM


This is our dresser. Rhett's used it most of his life, and before that it belonged to his brother. It's old wooden handles twist and one is missing. It's trashed and worn out on the finish, but the structure is good.
We've used it our whole marriage, but in the midst of project mayhem, I decided to give this a new look.
I found this Pottery Barn table and I really liked the green distressed finish and wanted to try to mimic it on the dresser:

So to refinish the dresser:
1. Remove all the old hardware.
(I threw mine away)

If you are using your same hardware, keep it and continue.
If you have new hardware, chances are the holes in the drawer fronts will need to be different, so fill the old holes with wood filler
2. Sand
If you're painting, you don't have to sand all the way to total raw wood, just enough to remove any enamel or glossy surface.


Wipe down with damp paper towels to remove any sawdust.
3. Prime
I used a water based primer.

4. Paint
I used a semi-gloss green. I was at Lowes and it's their cheap brand, Olympic
The color was Cavern Moss
**NOTE: I really prefer Home Depot for paint. They have the whole color scheme in big books to match your color really close. Lowes just had the paint chip cards that were out.
More options with Home Depot on paint.
Handles for the drawers is a different matter, Lowes has much better selection with much better prices. Usually I find both the orange and blue boxes near each other, so it's worth it for me to buy paint from Home Depot and handles from Lowes.

I painted 2 coats, letting the paint dry the recommended 4 hours between coats.
I applied the paint with a roller
5. Distress
Using 100 grit sandpaper (not too rough to take off wood, but tough enough so I'm not sanding for hours) to remove the paint and primer in the areas that would wear.


This was easy on this project because the dresser was so beat up, I could see all the divots and scrapes from prior use and just brought those to the surface by sanding the paint away.

You can see the white of the primer in between green paint and raw wood. That worked out fine, just another color to add depth in the end.
6. Stain
I used Minwax Red Mahogany stain to antique the dresser. It's really dark, and the reddish brown is what I was going for over a walnut or something.

I painted on the stain, and by the time I finished, it had been 15 minutes so I started wiping off the stain where I started right away. By the end, the stain has sat too long on some areas, so I had to loosen it with Mineral Spirits to get it off.
7. Polyurethane
I painted 2 coats of Minwax semi-gloss polyurethane to seal the paint and stain.
Also to give it a finished, polished look.
It needed to dry 3-4 hours between coats.

8. Hardware
I've always loved cup handles. But they are so expensive! Like $5.00 per handle, so this dresser with 10 handles would have cost $50 just in the hardware.
So to my delight, Lowe's is currently closing out the shiny gold cup handles for only $1.20 each. So I got my cup handles and just needed to paint them.


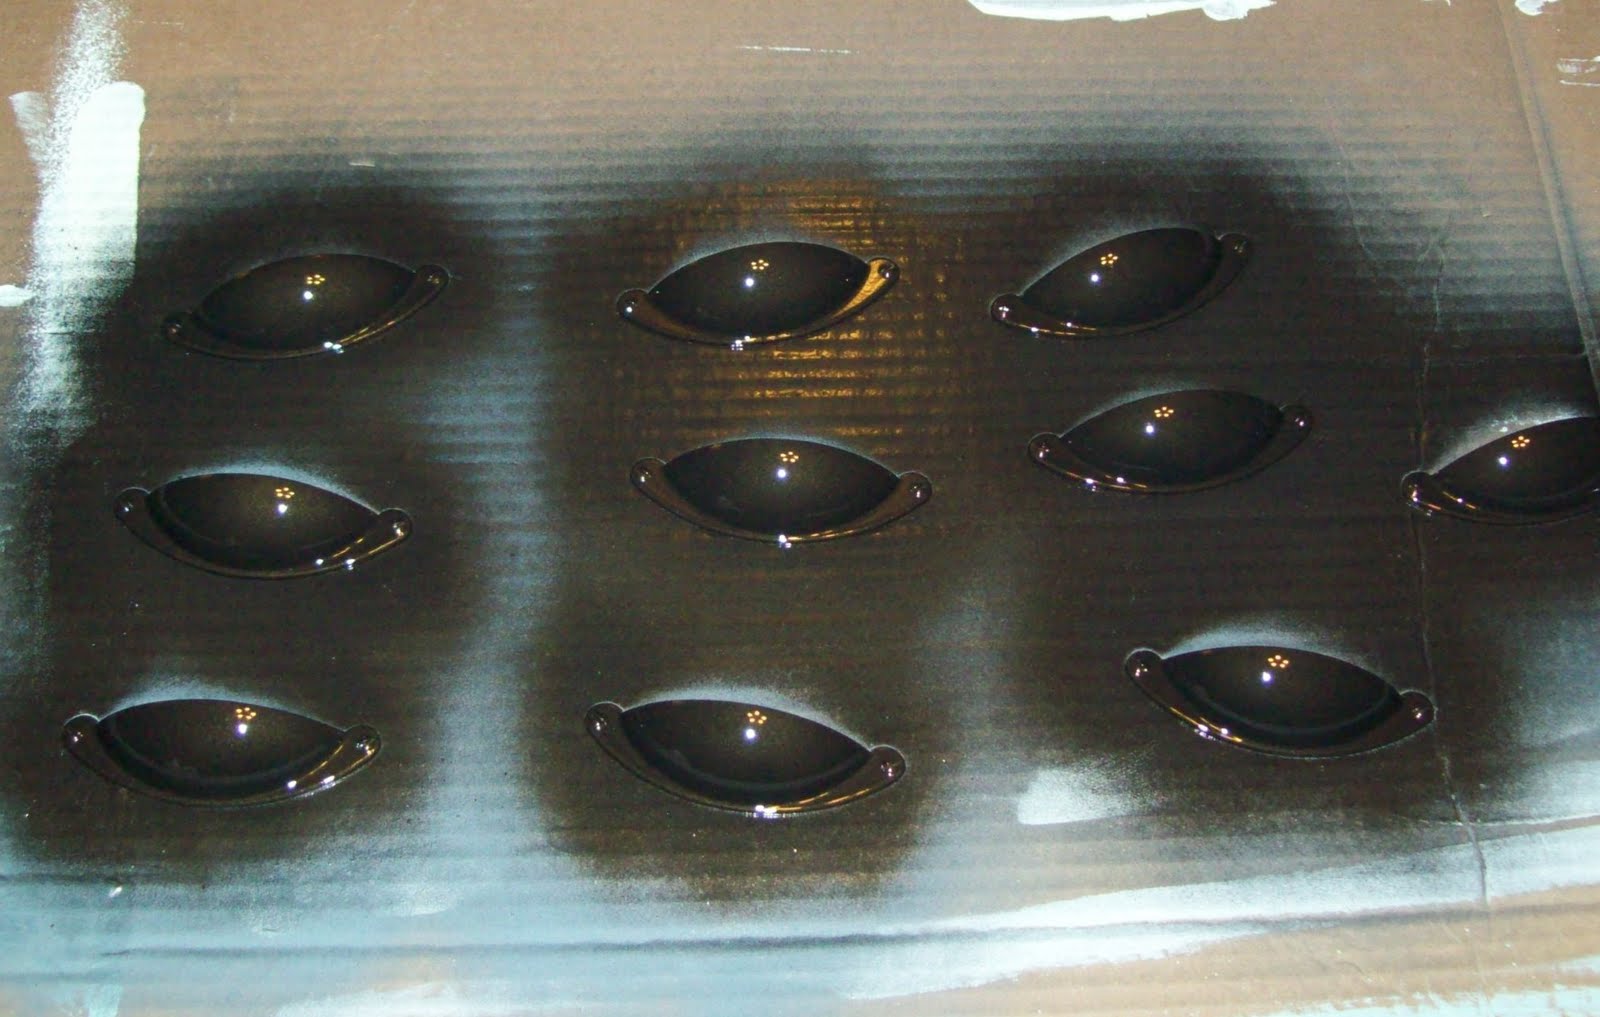
Spray paint primer.
10 minutes.
Spray paint Oil Rubbed Bronze.
10 minutes.
Oil Rubbed Bronze again.
To put new hardware on, the biggest deal is drilling the holes in the right places.
With 10 handles, 2 screws each, I didn't want to have to measure each one, so I made a template out of card stock to speed up the process.
I measured the distance from the edge of the drawer, and made holes in the card stock the correct distance for the screws. The horizontal line is what I used to measure down from the top of the drawer to get it in the middle.

So I'd line it with the edge, measure to the center vertically, and my husband drilled right through the paper each time and they all fit perfectly, and were lined up drawer to drawer.
Saved a ton of time measuring!
FINISHED!


15 comments
looks soo much better! I love the added mahogany stain too. Very pretty. And way to go on the handles and painting them instead of spending the extra 4 dollars per handle! Great job!
ReplyDeleteJess, I LOVE it! I've been wanting to refinish an old dresser turquoise, but haven't found a dresser. I'll have to revisit your tutorial if I ever get to do it!
ReplyDeleteWow-I love this dresser!!
ReplyDeleteJana
This is my favorite project thus far! Great job.
ReplyDeletewonderful dresser!!! I am seriously coveting it right now. My girls clothes are all stacked in a bookshelf because I have not found one I am willing to pay for.
ReplyDeleteGreat job!
This turned out great! The bin pulls made the whole thing. Way to find a deal!
ReplyDeleteLooks terrific! Who knew it could be such beauty!!!
ReplyDeleteIt looks like a completely different piece of furniture - great work!
ReplyDeleteThat green is fantastic! And I love me some cup pulls, too! I'm going to have to go and see if my Lowe's is having the same deal.
ReplyDeleteGreat Transformation!!!
ReplyDeletei love the color- it looks awesome! and the pulls really make that resser.... nicely done!
ReplyDeleteWowzers, I didn't see the potential in that one! It turned out really wonderful all around, great transformation!
ReplyDeleteFicou muito linda a comoda, pena que quando pensamos em reformar um móvel pensamos sempre no trabalho que vai dar, então muitas vezes deixamos de mão mas o resultado é lindoooo!!!!
ReplyDeleteParabéns!!!
Beijokas!!!
I love how this turned out. Great job. I really love the hardware that you choose too. I No matter how old and beat up furniture is a great paint job just brings it back to life!
ReplyDeleteAmy @SistersoftheWildWest.blogspot.com
you're a very talented lady!
ReplyDeleteThank you for stopping by, we love to hear from you!