
Easter Dress Tutorial
5:00 AM
I've put together a little tutorial from the little Butterfly easter dress I made. The tutorial dress is a variation, with the solid skirt and contrasting bodice. Just another idea with the basic dress.

The pattern is sized for 3-6 months, but you could make it larger by adding 1/2" per size to each side of the pattern pieces that aren't the FOLD edge.
So here we go!
SUPPLIES:
fabric varies depending on your design, but this combo shown above you'll need:
-1/4 yard main print (gray flower)
-1/8 yard bodice (pink)
-20" bias tape (1" double fold)
(I chose to make my own bias tape to match, here is Dana's tutorial to make your own bias tape.
I don't have her fancy iron folder gadgets, but you only need 20" so just using an iron works)
-9" to 12" elastic 1/2" wide

I. BODICE
1. SIDE SEAMS
Take your two bodice pieces, and with right sides together, sew the two side seams with 1/2" seam allowance. Zig-zag or serge edges if your fabric will fray.

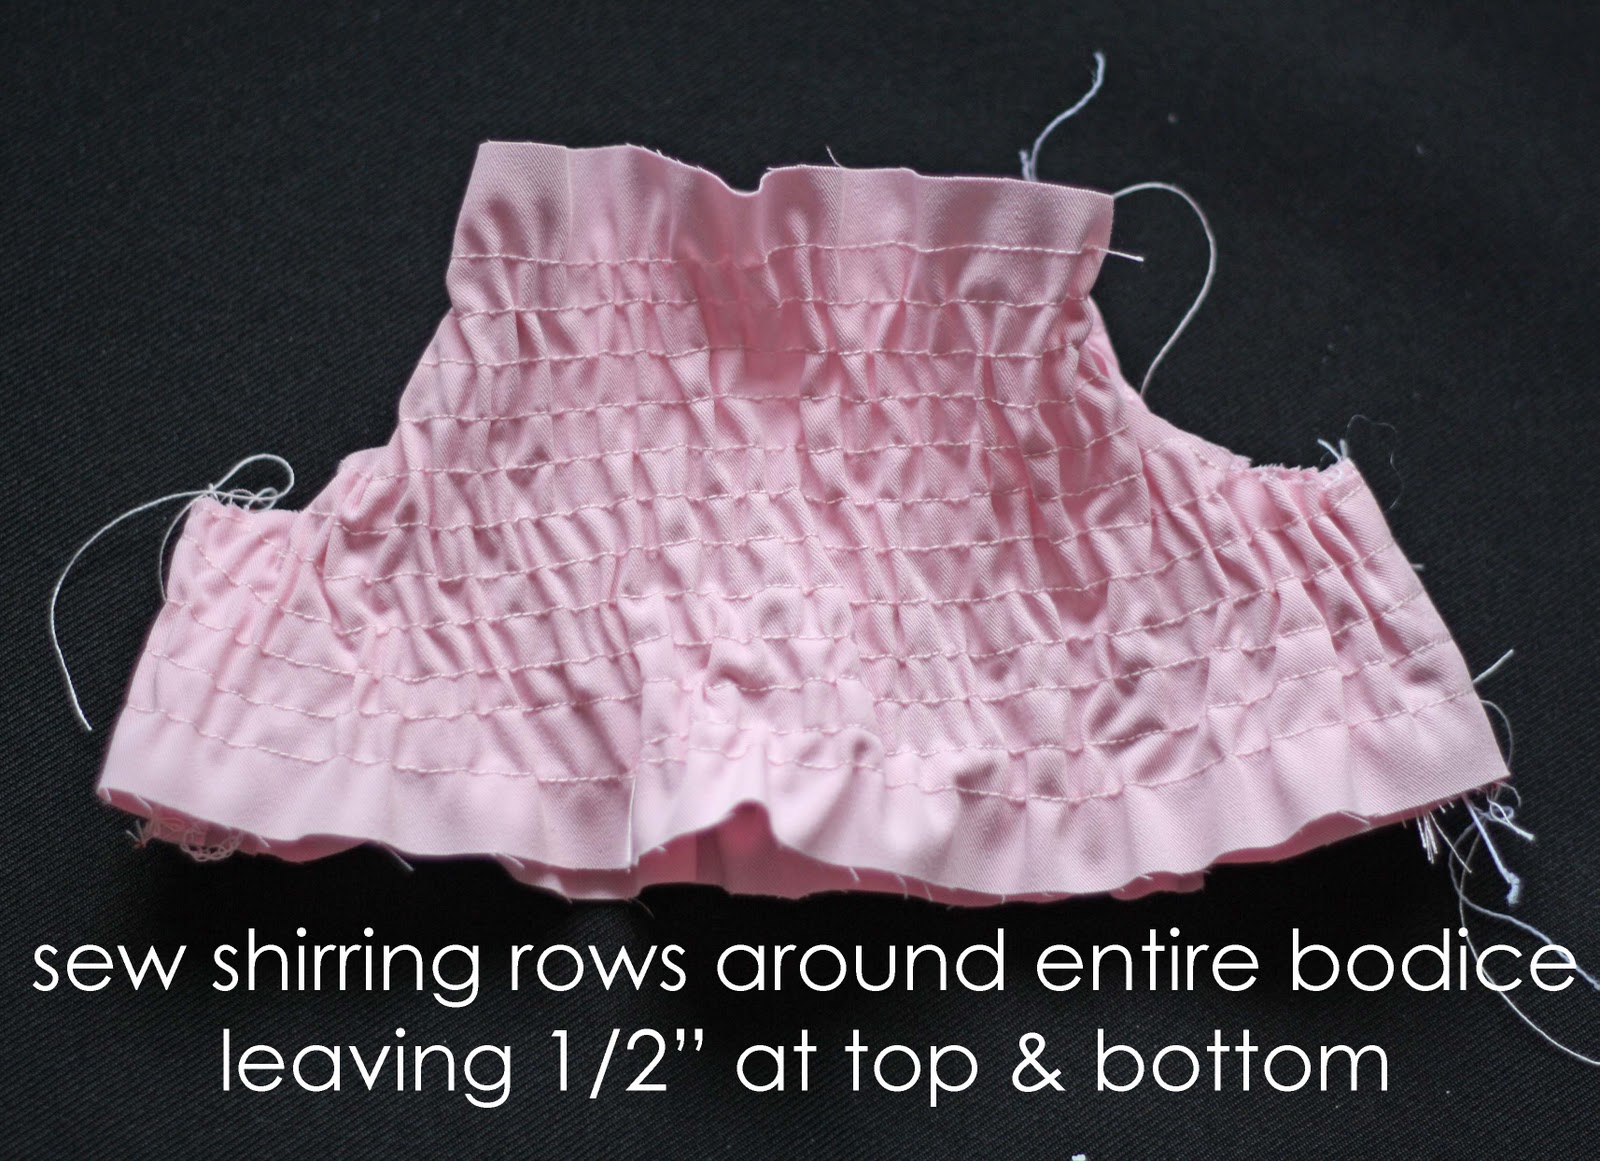
2. SHIR BODICE
To scrunch up the bodice, you sew shirring rows across. To shir, it's just like sewing regularly, except you switch out your bobbin with elastic thread. I find elastic thread in the notions section in a package.
You do have to wind the elastic thread on your bobbin by hand to make sure it's not stretched as it's wound.

So using regular thread on top and the elastic in your bobbin, you sew lines 1/4" apart across the bodice. Make sure you are sewing with the regular thread on the right side of your fabric, as you don't want the thick white elastic thread showing on the outside.
Here are a few links with info on shirring if you're new to this process:
Also, if you have a Brother brand sewing machine, you'll need to change your bobbin tension to get it to work, info on that here.
Everything I read suggested to tie the elastic threads in knots as just back-stitching can come out. Rather than having this problem, I just made the whole bodice one continual seam. I'd come down a row to the edge, then pivot the corner, sew along the seam alowance the 1/4", then head down the next row, working my way down the bodice.

As you sew, the rows bunch up more. I start at the top of one side, then work down, then flip it over to the other side until the whole bodice is shirred.
3. ADD SLEEVES
It's easier to hem your sleeves before they're attached, so iron 1/4" up, then fold it another 1/4" and top-stitch the hem for both sleeves.

Then to pin the sleeves to the bodice, you'll have the bodice inside out, and the sleeves right side out. First pin the two hemmed corners of the sleeve to the bodice side seam. Then pin your way up each side of the bodice, so the top of the arch on the sleeve shape will be pointing straight up when it's pinned.

Here's a close up of the two hemmed sleeve corners overlapping on the bodice side seam when the sleeve is sewn on.

When you sew the sleeve, it won't be a full circle as with normal sleeves. You'll just sew in the bottom half of the circle.

From here your bodice will be scrunched, with the sleeves on.

4. SEW NECK CASING
To complete the neck, you'll next sew on your bias tape to make a casing.
Rather than show each step, I'm just going to reference Dana's tutorials:
If you're making your own, you'll need approx 20" or so. If you're buying it, you'll have a lot left over from your package.
As you sew, the 4 places the sleeves connect to the bodice seems like a corner, but just stretch the corner straight and sew in a straight line, and it will curve open to look like this.

Remember to leave 1" to 2" unsewn to lace your elastic through.


Use a small safety pin to lace your elastic through the casing, around to come out the other side of the hole.
Once my elastic was in, I pulled it to the length that the scrunch around the neck looked good to me. On this particular dress, it ended up being around 9". Your dress or stretch in elastic may vary, so just do what looks best to you. You'll sew the ends of the elastic together, then sew the last hole of casing closed.

BODICE FINISHED!
II. SKIRT
**If you'd like the layered skirt as seen here, I cut 2 butterfly strips 3.5" wide x 28" long, then the 2 orange strips 2.5" wide x 28" long.

I sewed the strips every other one with 1/4" to 3/8" seam allowance, then pressed it flat and top-stitched the seams to help them lay flat. At this point you'll have a striped rectangle and the following instructions for attaching the skirt are the same.
1. Make Tube
Take your large rectangle of skirt, fold it in half with right sides together, and sew the seam with 1/2" seam allowance.

2. Gather Top of Skirt
To scrunch up your skirt, I just sew 1/4" from the top with my longest stitch length (5) and highest thread tension (10). The machine takes big stitches and gathers as you sew. This helps to have a uniform gather before attaching the skirt to the bodice.

3. Sew Skirt to Bodice.
With the skirt inside out, and the bodice right side out, you'll put the bodice with the head down into the skirt, so right sides are together. Adjust the gather in the skirt so it's even all the way around. I chose to line up the skirt seam in the center back of the bodice.
Then you just sew with 1/2" seam allowance around the skirt and bodice. You'll want to stretch your bodice a bit as you sew, since it will be scrunched up. That way the waist of the dress will stretch with the bodice.

4. Hem Skirt
You can finish the hem however you'd like. I made a 1/2" hem, then top-stitched a 1" wide pink grosgrain ribbon 1.5" from the bottom of the hem.

You're finished!


10 comments
I am LOVING the pink and gray!
ReplyDeleteThis comment has been removed by the author.
ReplyDeleteYAY!! gotta go get me some fabric!
ReplyDeleteThis is such a pretty dress!! And it just so happens that I'd like to make some pretty dresses as a baby gift, and I don't have an itty bitty baby around any more to give me any idea about fit. Thank you!!!
ReplyDeleteI linked to your tutorial on Craft Gossip Sewing:
http://sewing.craftgossip.com/tutorial-easter-dress-for-little-girls/2011/03/16/
--Anne
Hi from your newest follower - I ♥LOVE♥ the dress and such a fantastic and easy to follow tute! Stop by and say hi if you get a chance at The Quick Unpick
ReplyDeleteI made this dress today for my 3 year old. Thanks for the tutorial! The dress turned out great and she got many compliments.
ReplyDeletePhotos!
http://www.flickr.com/photos/77133272@N06/6958320852/in/photostream/
I printed this out and made the dress but it turned out tiny. It won't even fit over my 9 lb 3 month old... I made sure when I printed it that the printer wasn't shrinking it and I followed the directions exactly like you have... Any thoughts?
ReplyDeleteSo sorry it didn't work for you Noelle! This tutorial is 3 years old, so I should have added the 1" test square to make sure things were printing to scale. But to solve the issue of the current dress, you could make a new bodice, and add 1/2" to the fold side of the pattern piece, and maybe 1" to the side seam to give you a total of 3" wider bodice. Maybe measure your baby as well to make sure 3" is enough room. If you want to try to use your bodice and widen it, I could give you some tips as well if you don't want to start over. Email me if you have questions: runningscissor@gmail.com and so sorry it didn't work! So frustrating!
DeleteI want to make this dress but I cannot get to the pattern. It asks me to login to google and then it says I need to request permission from owner. Is there another way to download the pattern? Thanks!
ReplyDeleteI had to download the PDF to get it to print as I was having a similar problem. I used Chrome and when it downloaded I could print it that way. Hopefully that works for you!
DeleteThank you for stopping by, we love to hear from you!